01. Voluntary contribution payment
We make our portal wechange.de available to all users for a voluntary contribution. This contribution ensures that everyone can use WECHANGE safely and without advertising and ensures the maintenance, operation and further development of the platform. The guideline for cost-covering operation is €7 per person per month. However, since we know that this contribution is not feasible for everyone, we rely on a solidarity model: everyone gives what they can afford. A mandatory payment is only necessary for storage space updates. For projects and groups, 1 GB is included, each additional GB costs you €1 / month (see section "Nextcloud"). WECHANGE is only as good as we make it together. That costs money. But we don't want to be dependent on third-party funding, nor do we want to copy the questionable business practices of the big data octopuses. Instead, we rely on voluntary contributions from you, our users. It's up to you to prove that it works!
In order to operate the platform www.wechange.de at cost, we need €7 per month per person. This covers operation, maintenance, our support and updates. In return, we provide you with a platform on which you can work without advertising, without data sharing, in compliance with the GDPR and with the best open source tools. And our great support service, which can be reached quickly via Rocket.chat or by phone.
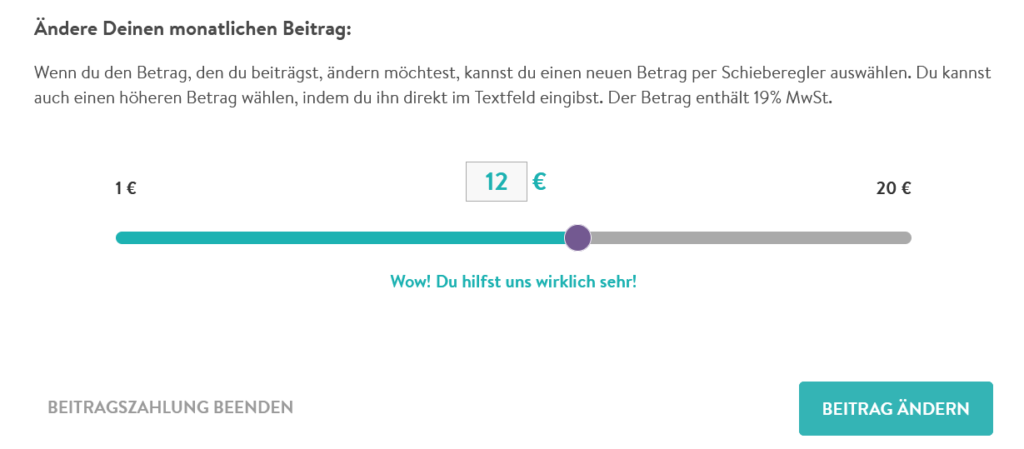
You can set up a contribution payment or change the amount of your contribution at any time.
To do this, open the page “Your Contribution” and change your contribution using the slider or enter it manually. Your changed contribution will apply from the time of the next debit.
You can choose one of the following payment methods: direct debit (SEPA transfer), credit card and (soon) Request to pay. We work with Better Payment Germany GmbH to process payments.
The monthly contribution you choose is not a donation, but a voluntary payment for an electronic service. We cannot therefore issue a donation receipt, but you will receive an invoice from us. The amount you choose is the gross amount including 19% VAT, the VAT will be shown on the invoice.
Of course, we would also be happy to receive a one-off contribution. Please enter either
a) enter the desired amount using the slider or manually and stop paying contributions after the first payment has been made; or
b) transfer the amount directly to our account with the subject “Further development of the platform” and your first and last name.
Bank details:
Account holder: wechange cooperative
GLS Gemeinschaftsbank
IBAN: DE34 4306 0967 1180 6747 00
BIC: GENODEM1GLS
c) If you need an invoice for your contribution, you can simply use our one-off payment form and fill in the fields according to your needs.
You can find it here: wechange.de/cms/einmalzahlung
There you can state in the comment field what your contribution should be used for (e.g. operation and further development of the platform) and provide further information. You will then receive an invoice that you can transfer to us.
For security reasons, we do not store your payment details ourselves, but work with Better Payment. If your payment details change, you must stop your payments and then set them up again with your changed details.
In your personal area You can view your payment information at any time (under “Your contribution”). There you will find information about the selected payment method, the amount of your contribution and the date of the next debit are displayed. In the “invoices” you can download the invoices for your previously paid contributions as PDF files.
If you no longer want to pay monthly contributions, you can stop paying at any time. To do this, you must be logged in and then click on your profile picture at the top right and select the option "Your Contribution". There you will find the button "End payment of contributions" at the bottom left of the page and follow the further instructions. Click "End payments" again at the bottom right of the page, confirm with OK and you're done - contributions have ended!
It is also possible to make a contribution as a group, club or organization. To do this, you set the contribution (the guideline is €7 per person/month for a cost-covering operation) and click on "Set contribution amount". Then tick the box "Payment is made in the name of an organization" and enter your details. The invoice will now be issued for the specified organization.

02. Registration and profile
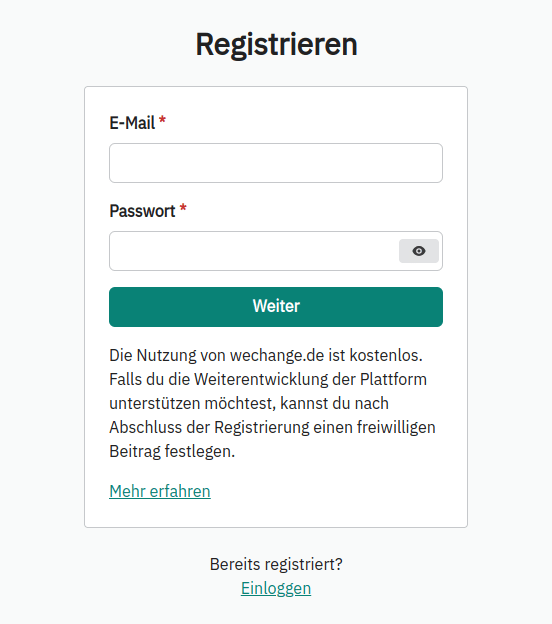
You register by entering your email address and a secure password on [we_faq_signup_url]. On the next page, enter your display name, solve the captcha and confirm. You are now registered! You can then fill out your profile step by step, for example, create a description, upload a profile picture and enter your location. All of this is optional, but it helps other users to connect with you. Of course, you can also fill out and edit your profile at any time later.
You will also receive an email with a confirmation link immediately after registration. Only when you click on this link will you have full permissions on the platform, e.g. to create groups/projects, post in the forum or receive email notifications.
Unfortunately, some email providers sometimes have difficulties sending emails to new users. If you have not received an email to register, simply write a short email with the subject "Registration failed" to [we_faq_contact_url] and we will activate you as soon as possible. Thank you for your understanding!
You are probably already registered on the platform. Try logging in at [we_faq_login_url] (if you haven't already done so). If necessary, you can reset the password. If the member information does not look familiar, it may be that another user has accidentally used your address. In this case, please write us a message at [we_faq_contact_url].
If you have already registered and created a profile, you can log in with your access data (name or email address and password) at [we_faq_login_url].
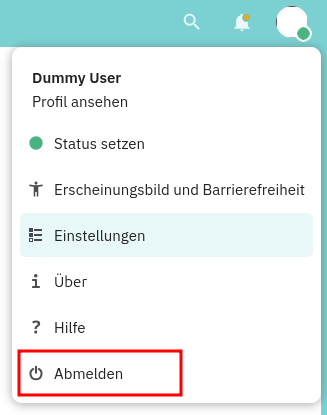
If you click on your profile picture in the upper right corner you will find the sub-item “Log out”.
If you click on the profile picture in the top right corner, you will find the sub-item "Profile Settings" ([we_faq_profile_edit_url]). Under the item "Who can see your platform profile?" there are the following three options:
- Only members of your projects and groups: your profile is only visible to users who are also members of one of your groups and projects.
- Only registered users: All users who are registered on wechange.de can view your profile.
- Everyone (profile publicly visible): Even non-registered visitors can view your profile.
If you click on the profile picture in the top right corner, you will find the subsection "Profile Settings" ([we_faq_profile_edit_url]). Here you will find all your basic data and can change it, such as email address, name, profile picture, location and interests.
[we_faq_yt_edit_profile]
If you click on the profile picture in the top right corner you will find the sub-item "Profile settings". Here you will find the item "Change password" in the left menu bar ([we_faq_password_change_url]). First enter the old password once and then the new password twice.
On the login page [we_faq_login_url], click on the "Forgot your password?" option in the left menu bar. A new window will open. Here you must enter your email address and follow the password reset instructions in the email.
If you click on the profile picture in the top right corner, you will find the subsection "Profile Settings" ([we_faq_profile_edit_url]). Here you will find all your basic data, including your email address. Simply enter the new email address here and then click "Save" at the bottom.
If you click on the profile picture in the upper right corner you will find the subsection “profile settings”. By clicking on “delete profile" in the left menu bar, your user account and all data stored in it will be deactivated and irrevocably deleted after 30 days. Access to your groups and projects will then no longer be possible.
Attention: If you are registered with the same user account on other portals, deleting will also affect these portals! If you want to leave a project or group, select "Leave" there without deleting your profile.
[we_faq_organisation_name] is available in numerous languages and new ones are constantly being added. If you click on the profile picture in the top right corner you will find the sub-item "Change language". By clicking on this setting you can change the language of the menu navigation. Please note: The content created by users remains in the original language and is not translated.
03. Groups and Projects
Similarities:
To work together as a team via wechange.de and be visible, you can choose between a "group" and a "project". Both give you an internal workspace with an unlimited number of members and a publicly visible page (your microsite, which can be found via the map, for example). The tools within the workspace are also almost the same. Both groups and projects allow you to use the following functions via the respective dashboard:
- News
- calendar (including appointment scheduling and video chat)
- Pads (documents and tables)
- cloud folder
- file storage
- Surveys
- Tasks
In addition, a Rocket.Chat channel is automatically created for both groups and projects. The only difference in terms of tools is the "marketplace" for creating requests and offers, which only groups can use.
Differences:
Groups and projects differ in their relationship to one another. In a group, you can create as many (sub)projects as you like or assign them later. This allows you to, for example, map the relationship between a club (group) and its working groups (projects). Creating a project within a group is also suitable for temporary matters, such as organizing a summer festival.
Functionally, this assignment allows you to transfer news and events from the group to one or more (sub)projects so that they also appear on the dashboard there. However, this transfer currently only works in this one direction (not from the project to the group).
Projects can be assigned to a group, but they don't have to be. You can also create a "standalone" project and assign it to a group later if necessary.
Since the functions of the two work areas are almost identical, the main question is what you want to map. If you are a simple team - regardless of size, but without subdivisions - one project is usually completely sufficient. You can assign this to a group directly when creating it or later, but you don't have to.
It is different if you want to map a more complex structure consisting of a parent element with several sub-elements, e.g. an organization with several independent subject or task areas. In this case, it is a good idea to create a group for everyone and map the sub-elements using projects. In the projects, you can create content that is only visible to the project members and not to all members of the parent group. You can also invite users to a project who are not members of the group.
On the other hand, you can also map more complex structures within a group or project. This is useful if the contents of the individual sub-elements (e.g. topic or task fields) should also be visible to all other members of your organization. To subdivide your group or project, you can create subfolders in the cloud or in pads and files. On Rocket.Chat, you can create several sub-channels, so-called "conversations", within your shared channel. This way, everything stays together, but is still organized for clarity.
There is currently no function for users to perform this conversion themselves, but you can send us an email to support@wechange.de and we will take care of it.
The WECHANGE forum is a group in this sense. What makes it special is that all newly registered users are automatically members of the forum. This creates the WECHANGE community with tens of thousands of people who can exchange ideas and network (mainly via the news and the events calendar).
You can now set up a new group yourself at any time and free of charge. To do so, click on the plus symbol in the menu at the top and select “Group”. Another option is to use the group overview under https://www.wechange.de/groups and then the button "Create group“. You then have the opportunity to provide the following optional information; only the group name is mandatory.
- Description
- type of application to participate
- Icon (group logo)
- background image
- website
- topics
- keywords
- Location
- Related Projects/Groups
- visibility settings
- Which apps should be activated?
If you switch from the General tab above to Microsite, you can add additional information that will be displayed on your publicly visible group microsite.
All information can be changed at any time, and projects can also be added and members invited at any time. As the creator of the group, you are automatically an admin.
You can also appoint other group members as admins. Only you can edit the group settings.
All steps are analogous to creating a new group (see above), or directly via this link: [we_faq_project_add_url]
There is also another way to create a project, and that is within a group. The group dashboard contains the "Projects" widget with the "Add project" button. The only difference with this variant is that the respective group is automatically entered in the project settings under "Group membership". This assignment can also be made manually, directly when creating or later. The information is optional, so your project can also be "standalone". If you want to specify membership of a group, you must first be a member of the group with your user profile. You can then specify in the project settings that the project belongs to this group.
Click on "Settings" in the group or project drop-down menu. Here you can change all the details you entered or left out when creating the project. You can even change the name, which will generate a new URL.
Only admins can change the settings. In addition to the creator of the group or project, those members who have been appointed as admins in the “Members” area are also admins.
This assignment is made in the project settings. These are defined for the first time when the project is created. They can be changed later (only by project admins) by switching to "Settings" in the project menu.
In the “General” tab, relatively far down, there is the field “Which group does the project belong to? (optional)”.

Important: Here you can only select groups in which the person hiring (i.e. the project admin) is already a member. You may therefore first have to apply for membership in the desired group.
The selection of which projects are assigned to a group is therefore not made by the admins of the group and cannot be directly influenced by them.
Usually, the easiest way is to copy the link to your group or project from your browser address bar and send it somehow to the people you want to invite. When they follow the link, they will see the microsite and the "Sign Up" (if they already have a [we_faq_organisation_name] profile) and "Register" (if they don't have one). Once they have registered or logged in, they will be taken back to your microsite and can request membership. Admins will be notified and can confirm the membership request.
Admins have another option for adding members. In the "Members" section, they can select already registered users that they want to add, or send an invitation email to people who are not yet registered. This option eliminates the step of users first applying for membership and an admin having to confirm it.
NEW: In the group or project settings, the “type of participation application” can be changed so that users do not have to apply for membership first, but can join directly.
The person who created a group or project is automatically an admin. There must always be at least one admin, but several or all members can be set as admins. This is done by an admin clicking on the arrow symbol to the right of the person's name in the "Members" area and changing the status to "Admin".
All groups and projects always have a publicly visible microsite. This shows at least the group or project name and the names of the admins. You can also display additional information by entering it in the group or project settings (especially in the "Microsite" area). This allows you to decide what and how much should be visible on your microsite.
In the settings you can also set the visibility. This concerns the standard visibility of the content you have created, e.g. news and events. According to the preset visibility, these can only be seen by members of the group or project. In the individual settings of each individual content, e.g. each piece of news, the public visibility can also be set manually so that this content can be found by external parties and may also be displayed on your microsite.
Conversely, in the group or project settings, you can also specify that created content is publicly visible by default. In the individual settings of the individual content, this can be changed to visibility only for members. Another effect of the public visibility of a group or project is that visitors to your microsite are shown the "View" button, which allows them to see your dashboard with the public content without having to apply for membership first.
As an admin, you can deactivate the group or project in the settings. It is usually possible to reactivate it later (see below). If you want all information to be irrevocably deleted, please write us a message with the relevant subject and content at [we_faq_contact_url]. The group or project, including all associated information, will then be completely and irrevocably removed from the system.
If you click on your profile picture in the top right corner, you will find the subsection "My profile". Here you will see the point "My deactivated content". You can reactivate groups and projects here. If that doesn't work, please write us a message at [we_faq_contact_url]. The old data will then be available to you and all group/project members again.
A move between [we_faq_organisation_name] and related portals is not yet possible automatically. In exceptional cases, it is possible to migrate groups and projects to another portal. However, this is quite complex and can only be done by the system administrators. If you need this, please contact us at [we_faq_contact_url].
The default storage limit at [we_faq_organisation_name] for projects and groups is [we_faq_limit_unit_quota] in total. If you need more storage, please contact us at [we_faq_contact_url].
If projects are assigned to a group, news and events from the group can also be displayed directly in the projects.
If you actively select this via the field (everyone can do this, i.e. the creator, admins and normal members), the news from the group will be displayed in sub-projects. You can selectively choose where the news is displayed.
04. Notifications
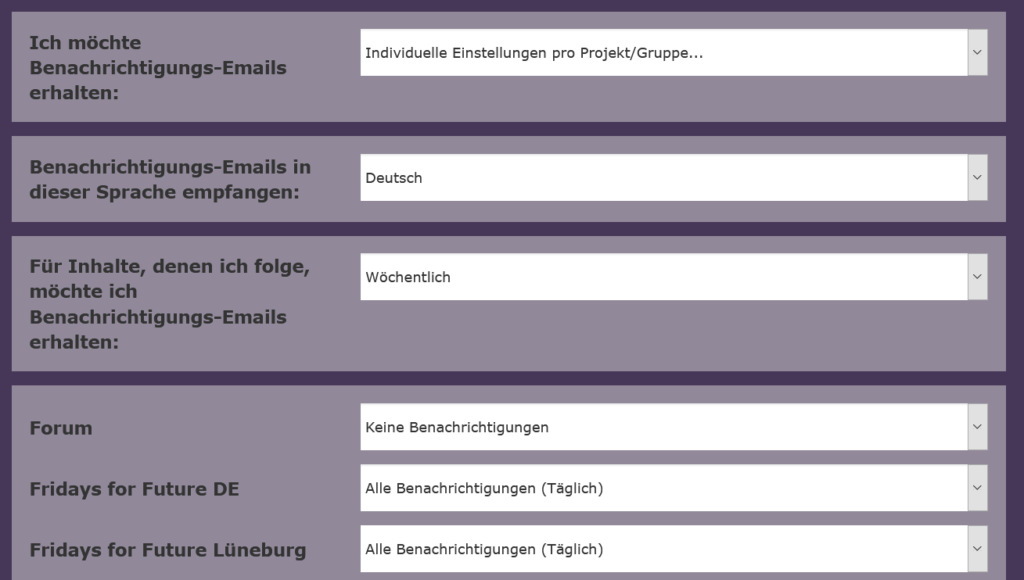
If you click on your profile picture in the top right corner, you will find the sub-item "Notification settings". At the top you can select how regularly you would like to receive emails with notifications from your groups and projects. In addition to "Immediately", "Daily", "Weekly" and "Never", there is the option "Individual settings per project/group", which we recommend here. This allows you to specify that you receive important notifications from your groups and projects more frequently and news from the forum (the entire [we_faq_organisation_name] community) only weekly or never.
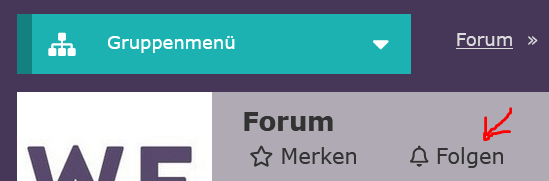
You can also choose how often you want to receive notifications about content you follow. By default, you follow groups and projects you are a member of, as well as all content you have created or commented on. You can use the "Follow" button to follow more content (or unfollow content you have already followed). An overview of all the content you follow is displayed on your personal dashboard at the bottom left.
It is best to set the frequency of notifications for content you follow to "Weekly" or "Never" so that you do not receive notification emails more often than you would like. If you do not want to receive notifications from the forum or other groups/projects (not even within WECHANGE via the bell), you can also unfollow them by clicking on the "Followed" button at the top of the dashboard or on the microsite.
[we_faq_yt_notifications_settings]
This is probably because the frequency of notifications about content you follow is not yet set accordingly in your notification settings. You can find this by clicking on your profile picture in the top right corner.
By default, you follow groups and projects you are a member of, as well as all content you have created or commented on. You can use the "Follow" button to follow more content (or unfollow content you have already followed). On your personal dashboard, you will see an overview of all the content you follow in the bottom left.
It is best to set the notification frequency for content you follow to "Weekly" or "Never" to avoid receiving notification emails more often than you would like. If you do not want to receive notifications from the forum or other groups/projects (including within [we_faq_organisation_name] via the bell), you can also unfollow them by clicking on the "Followed" button at the top of the dashboard or on the microsite so that it becomes "Follow". You will now no longer receive unwanted notifications.
In addition to notifications about activity on the platform (e.g. when a new event is created), you can also be notified when someone writes to you on Rocket.Chat. You can make the adjustments in your notification settings as described above. You can set whether you want to receive email notifications when you receive a direct message or are mentioned, or whether you don't want to receive email notifications at all.
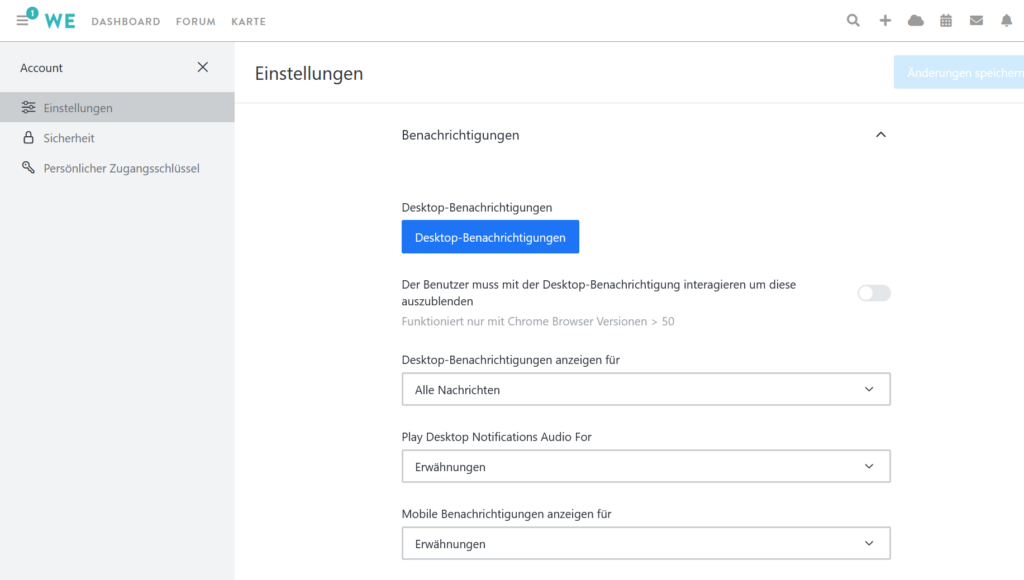
You can make even more precise adjustments on Rocket.Chat itself. Click on your profile picture in the top left and then on "My Account". Here, select "Settings" and then "Notifications". Here you can set up both desktop and mobile notifications. Desktop notifications require that the desktop client for Rocket.Chat is installed (see below).
Merken
Bookmarked content is displayed at the top left of your dashboard. These are the favorites that you always want to have in view
Follow
If you choose to follow a piece of content, you will automatically be notified of new content and will see notifications about it in the What's New section in the middle of your dashboard.
05. Rocket.Chat (Messages)
Of course there are! Depending on how precise you want to know, we even have two videos for you – here on YouTube or directly here on the page:
Complete introduction:
Brief overview:
Rocket.Chat is an instant messenger for teams of all sizes. It allows you to communicate efficiently in real time. Thanks to the sophisticated functions, your chat history remains clear and tidy even when several topics are being discussed in parallel and different people are involved (which can happen quickly). To avoid spam, only the users who are affected by or interested in a topic are notified. Everyone else on your team can still follow what the others are working on if necessary. Another advantage is that you can find content quickly and easily and link back to previous discussions.
Since 2019, Rocket.Chat has been integrated into WECHANGE, replacing the old messaging function. All registered users can write to each other via Rocket.Chat: internally in your groups and projects, with other users and even with the entire WECHANGE community (in #forum).
Rocket.Chat is based on the well-known messaging service “Slack”, but unlike it, it is open source. This means that the source code is freely available and is being further developed by people from all over the world.
You can open the messenger within WECHANGE in your browser by clicking on the message icon in the top menu. You will be taken to https://wechange.de/messages/
In addition to viewing in your browser, you can also access Rocket.Chat via a desktop client or mobile app (see below).
Rocket.Chat offers fully functional apps for desktop, tablets and smartphones for all common operating systems. You can access the desktop apps via https://rocket.chat/install/For smartphones or tablets, we recommend the app “fairchat”, which is available free of charge in App Store and Google Playstore (or via F-Droid). The advantage over the standard Rocket.Chat apps is that you can also receive push notifications with the fairchat app.
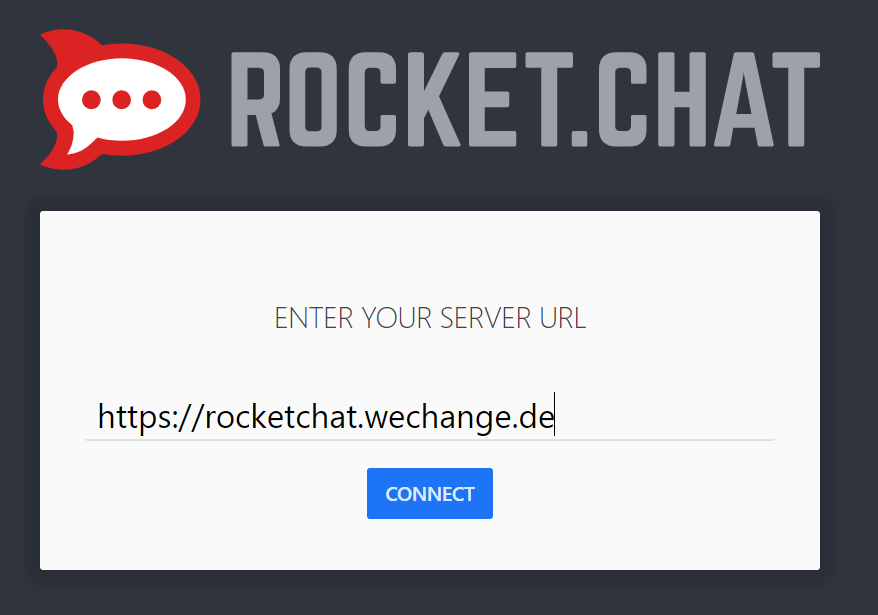
To connect to our Rocket.Chat server via the app (desktop or smartphone), you follow almost the same steps regardless of the operating system. You have to select to connect to a new server. Here you enter "rocketchat.wechange.de". Then you have to enter and confirm your login details from wechange.de. You should now be connected and have access to all your channels.
On the desktop:
In the browser or in the desktop app: Click on the profile picture in the top left (!) and select "My account". Then click "Settings" and then "Notifications" in the left side menu. Here you can set whether and how you want to be notified for different cases. You can also choose whether you want to receive email notifications for messages in which you are mentioned or that are sent directly to you under https://wechange.de/profile/notifications/ (where you make the setting is irrelevant because both are synchronized with each other).
On the smartphone:
To receive push notifications, you need to install the fairchat app and connect to the WECHANGE server (see above).
- Then open the burger menu at the top left.
- Select "Profile"
- Tap the slider icon in the top right corner.
- Select "Notifications"
- Set what you want to receive push notifications for.
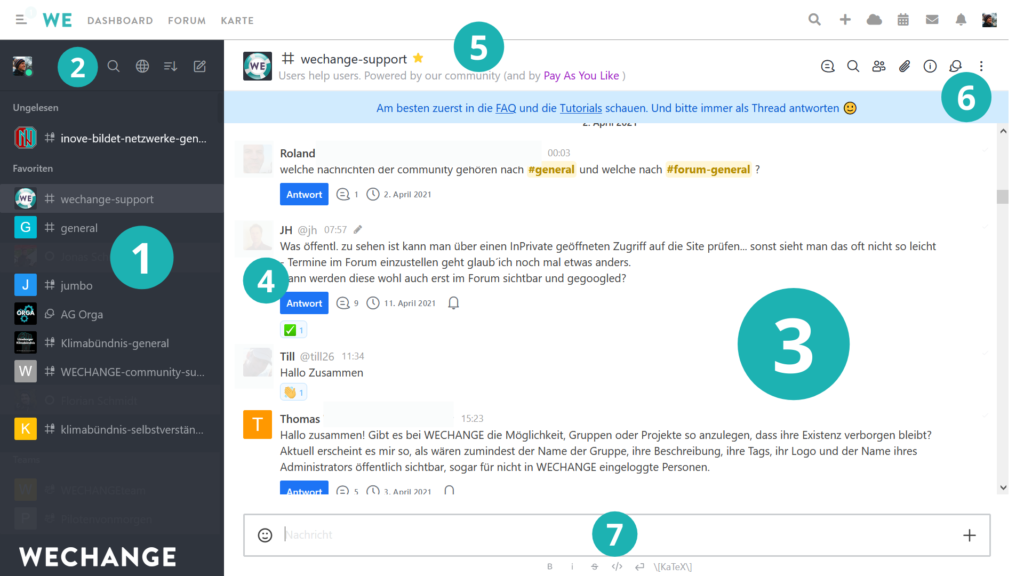
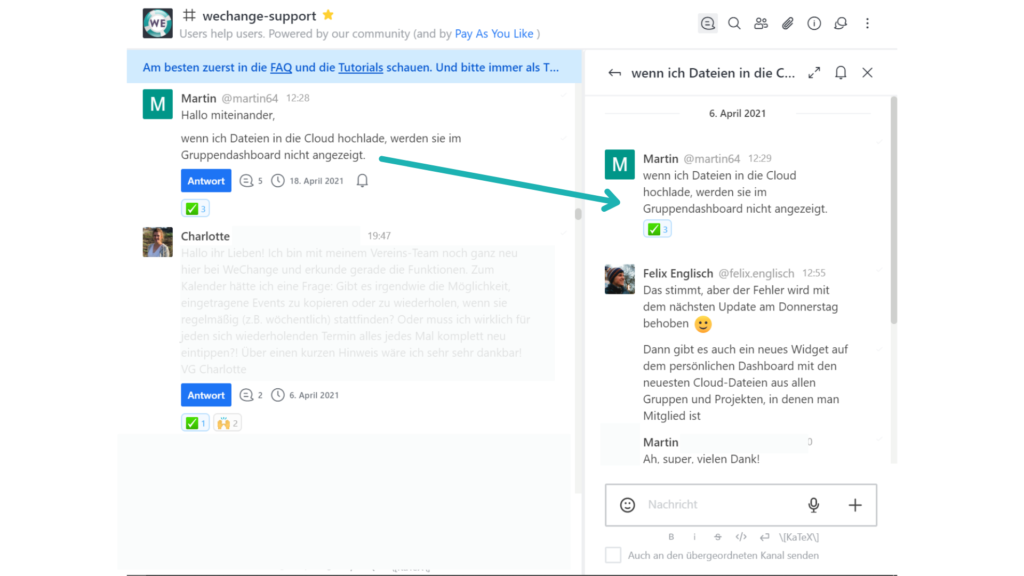
The image shows you how Rocket.Chat is divided.
- list of your rooms – sorted by
- Unread
- favorites
- conversations
- Private channels
- public channels
- direct messages
2. General Menu - You can:
- View and change your profile and settings
- Back to home screen
- Search Rocket.Chat
- Switch to a directory with all users and public spaces
- Customize your view and sorting
- Create a new room
3. Contents of the roomyou are currently in
4. A message in this room, for which a thread was created (see below)
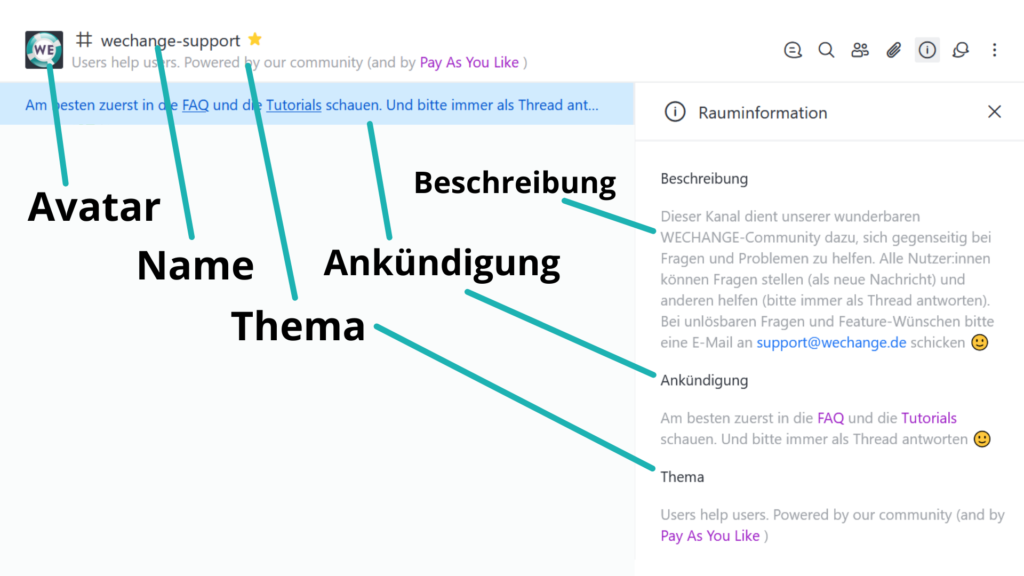
5. Spatial information
- avatar (profile picture)
- Name (in this case #wechange-support)
- Topic (the line below the name)
- Announcement (the attached note, which is highlighted in blue)
6. Room menu (e.g. list of all threads, all members, all files, all conversations, etc.)
7. Text field, into which you can type your message.
Rocket.Chat has different types of rooms in which you can communicate with one or more other users.
- channels are the most common and generally recommended way to communicate with other users. You can recognize them by the fact that they are marked with a hashtag ( # ). Channels offer you the full range of functions of Rocket.Chat. They are, in a sense, the main rooms.
- conversations or discussions (synonymous) are marked with two speech bubbles. Here you can also communicate with several other users and make full use of the range of functions. In contrast to channels, they are one level below the hierarchy, i.e. sub-channels. Conversations are always assigned to or subordinate to a channel and are therefore connected to it. You can also create them directly from the channel. You can use the channel menu to display a list of all the associated conversations, so that all members of the channel can join a conversation if they are interested.
- The direct messages take place between two users. You can also create a direct message room with multiple members using the "Create" button in the menu bar, but we do not recommend this (members cannot be added or removed later; the room cannot be deleted; you cannot set a name or topic, etc.)
A private Rocket.Chat channel is automatically created for each WECHANGE group and project and the same members are added. This means that you as a team can immediately use all the benefits of the messenger without having to make any further settings.
The special thing is that the news that you post on your group or project dashboard is automatically transferred to the channel so that the two communication channels are connected (conversely, chat messages are not transferred as news, as this could quickly get out of hand). Long news is shortened to the first 60 words, but a link leads to the complete news post. Previously, the full news was transferred to a read-only news channel and communication took place in the general channel of the group or project. These two channels have now been combined into one, with the endings #...-news and #...-general being omitted.
Your channel will also be shown as a small view on your group/project dashboard. You can activate or deactivate this widget in the group/project settings.
Admins of the group or project are automatically the owners of the associated channel. They cannot assign other roles, but they can add and remove members, delete messages and delete the room information. However, if the channel is changed from "Private" to "Public", the connection to the WECHANGE group/project is removed. The members are then no longer synchronized.
If you find interesting groups and projects on the WECHANGE map, for example, you can contact them directly. Select the object and click on "Contact" or "Write to group/project". A conversation is automatically created in Rocket.Chat, to which you and the admins of the group or project are added - and you can start writing!
- In the left (dark background) side menu, click on the “Create” button at the top right and select “Channel”.
- You can then enter a name and a topic.
- Now you can choose whether it should be a private or a public channel. Public channels are visible to all registered users on wechange.de and everyone can join, while private channels are only accessible to invited members.
- You can now enter these members and create the channel.
There are two options. The first is similar to creating a channel (see above). Here you have to manually select which channel the conversation should be assigned to.
Alternatively, you can create a conversation directly from the channel, for example to start a larger discussion. You can either click on the plus symbol in the bottom right and select "Conversation" or hover over a message, click on the three-dot menu and select "Start a conversation".
When you create the channel, you can add users by entering their names. You can also do this afterwards by clicking on the user icon in the top right and then selecting "Add user". However, this button is only visible to users with the "owner" role (that is, the person who created the room and other users appointed by them as owners). As an owner, you can also generate an invitation link via the members menu and share it with other people who are registered on wechange.de.
As the owner, you can also type “/invite @username” into the message field and send it to add a person (of course, you have to replace username with the profile name).
As a member of a channel (or conversation) with the owner role (e.g. because you created the room), you can customize the room information. This includes:
- The Avatar. The square image will appear at the top of the channel and on the left in the list of all your channels. When you change it, the new channel avatar will usually not appear immediately, but only after a few minutes or even hours, so don't be surprised!
- The name. This must not contain any spaces.
- The Description. It is displayed when members open the room information. You can take a little longer here.
- The announcementWhat you write here will be displayed as a pinned note at the top of the channel, so it's best to keep it short. To pin one or more links, Markdown is recommended: [Link text](https://beispiel.de)
- The ThemeThis will be displayed on one line under the name of the channel or conversation, so it's best to keep it short.
If you have changed the information, don't forget to save!
Short answer: Threads are like comment columns to a message, in which all replies and reactions to the original message appear organized in a side column.
Long answer: A big advantage over "classic" messengers like WhatsApp or Telegram is that with Rocket.Chat you can map out more complex communication in a team that is not linear. While in classic messengers all messages appear in a row one below the other and topics are often mixed up, in Rocket.Chat all messages have their own place: the thread. This is particularly useful when different questions are being discussed in parallel within a channel. When a question is asked, you do not reply with a regular message, but rather you hover your mouse over the original message and select "Reply with thread". A sidebar appears where you type in your message. The blue "Reply" button then shows that there is a thread for the original message, and the number next to the speech bubble reveals the number of replies.
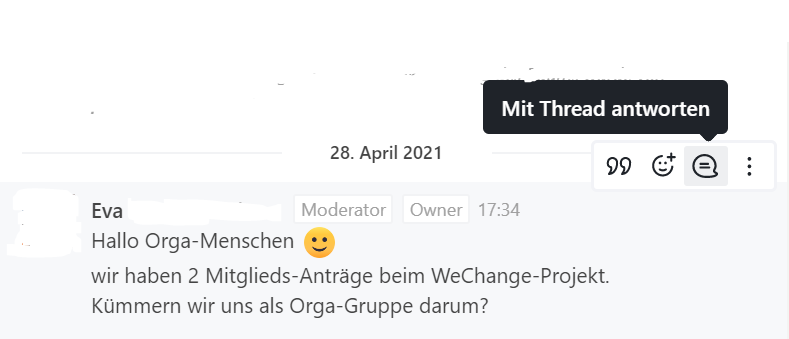
Threads are, in a sense, comment columns under chat messages. They help you to structure discussions and your communication in general. By using threads, you reduce the load on the channel and all members. Only those who follow a thread are notified of new replies, e.g. because they have already replied themselves. Nevertheless, everyone can read along and understand what it was about, even weeks or months later.
You can tag or highlight other users in a message by writing "@username". You must of course replace "username" with the person's profile name. If this is not unique and there are several users on wechange.de with the same name, you must also provide the identification number. If you don't know whether @laura5 or @laura12 is the right one, that's no problem. Type the first few letters after the @ and select the right profile from the auto-complete suggestions. This will also suggest users who are not in your channel. However, they will be shown the message "Not in Channel". The Laura without the message is the right one. It only gets complicated if you have several Lauras in the channel; in this case, it can be smart to mention both to be on the safe side, but then ask them to upload a profile picture, which makes recognition easier.
If you want to mention all members of the channel, you can write “@all”.
Members can have different roles and permissions within a room. A person's roles are displayed behind their name when they write a message. There are:
- owners: Whoever creates the room automatically becomes the owner. They can change the roles of other users, add or remove users (manually or via invitation link), and delete messages from other users. They can also change the room information or delete the room.
- moderators: They have almost the same rights as owners, except that they cannot delete rooms and cannot manage roles/permissions.
- Discussion leaders: You have no additional privileges compared to regular members.
In automatically created channels that belong to a WECHANGE group or project, the admins of the group or project are automatically the moderators. There are no owners. The roles of the other members cannot be adjusted accordingly - unless a member is appointed as admin of the WECHANGE group/project (and thereby also becomes moderator of the channel).
Since we switched from our messaging app to Rocket.Chat, all messages now go through this app. However, your old messages have not been lost. You can find them as follows: Click on your profile picture in the top right and select "My Profile". You will then see a button under your name "archive for older news". All old messages are stored there. However, you can no longer send messages through it. That is only possible via Rocket.Chat.
It is possible that you will see an error message when you try to message members directly via their profile. For example, “[undefined]” or “[User unknown]”.
In this case, click on the small letter symbol in the top right corner of the wechange menu bar.
If you are already logged in to Rocket.Chat, you will see your profile picture or your initials in the top left. Click there and then select log out.
Now click on "Enter Chat". This will start a new session in the Rocket.Chat messaging service. If you now click on "Send message" again on the profile, you can create and send it.
We are already working on an optimization here. Thank you for your understanding.
E2E stands for end-to-end and means that your chat traffic is encrypted by the sending device and only decrypted by the receiving device. Messages cannot then be decrypted by the server itself. This means that server-side backup or forwarding is not possible. Both devices must be online for an active conversation.
Generally
E2E encryption protects you because it encrypts your data from device to device.
Because E2E encryption is device-dependent, you must activate it for each device on which you want to use it. To do this, the system usually automatically creates a password for you. This password serves as the key for your data.
When you log into Rocket.Chat on a new device with your account, you will usually be automatically asked to enter your E2E password.
Enable E2E
Usually, when you log in to the chat for the first time, you will receive a message at the top to save your password.

If you click on it, it will be displayed.
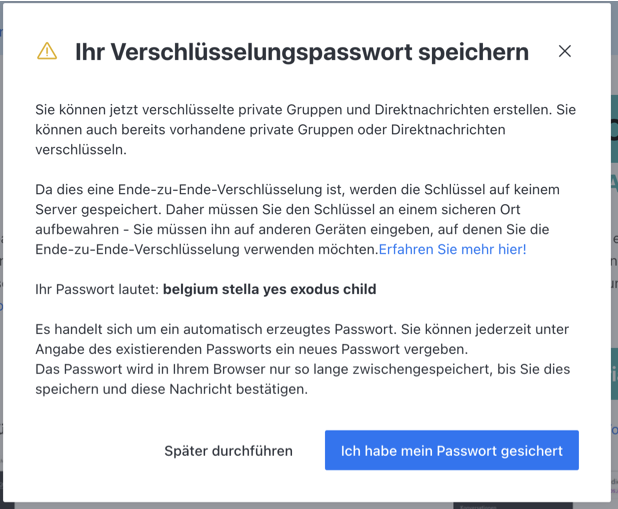
Save this password. You will need it on every device on which you want to send/receive E2E messages.
Enable E2E for conversation
You can activate E2E for direct messages with other people. To do this, you will find a menu in the top left of every chat behind the symbol with the three dots "...".
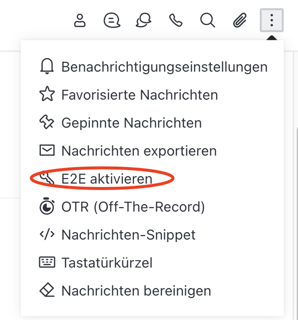
If the recipient has also activated E2E, you will see the item “Activate E2E” and can start an E2E encrypted conversation.
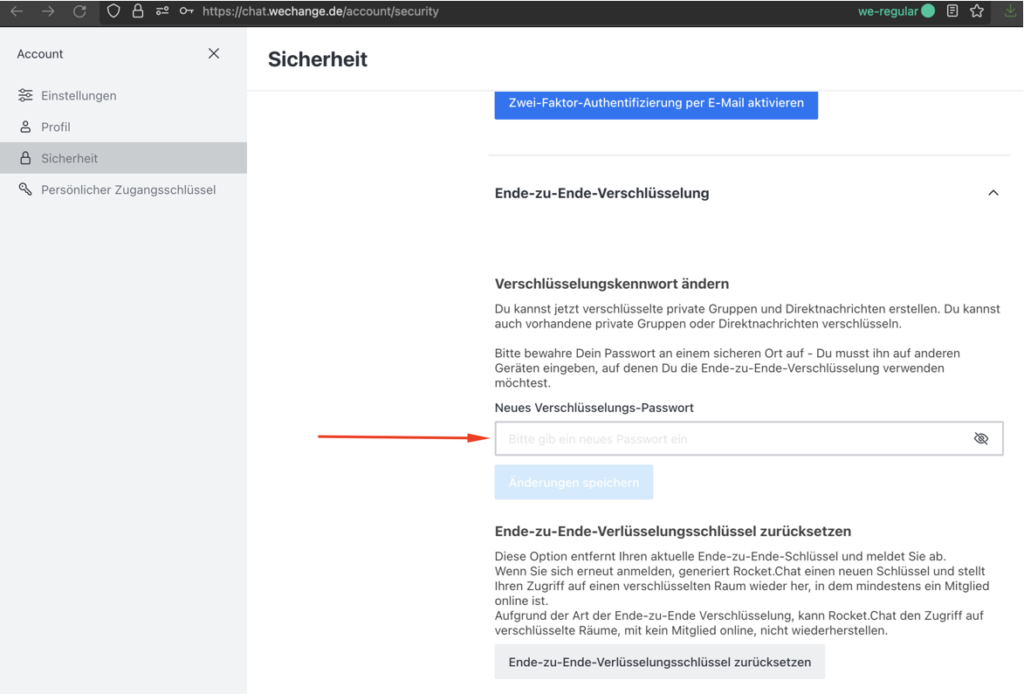
If you have problems with E2E (end-to-end) encryption, you can reset the settings.
To do this, navigate to your profile picture or your initials in the chat at the top left, open the menu by clicking and then select “My Account”.
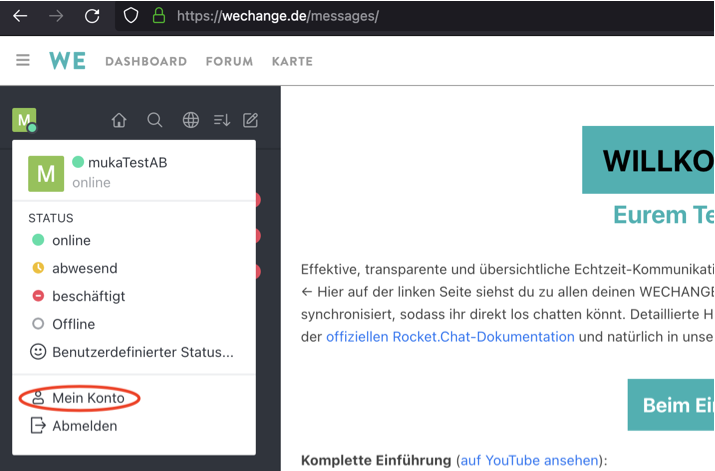
You will also find your security settings under My Account.
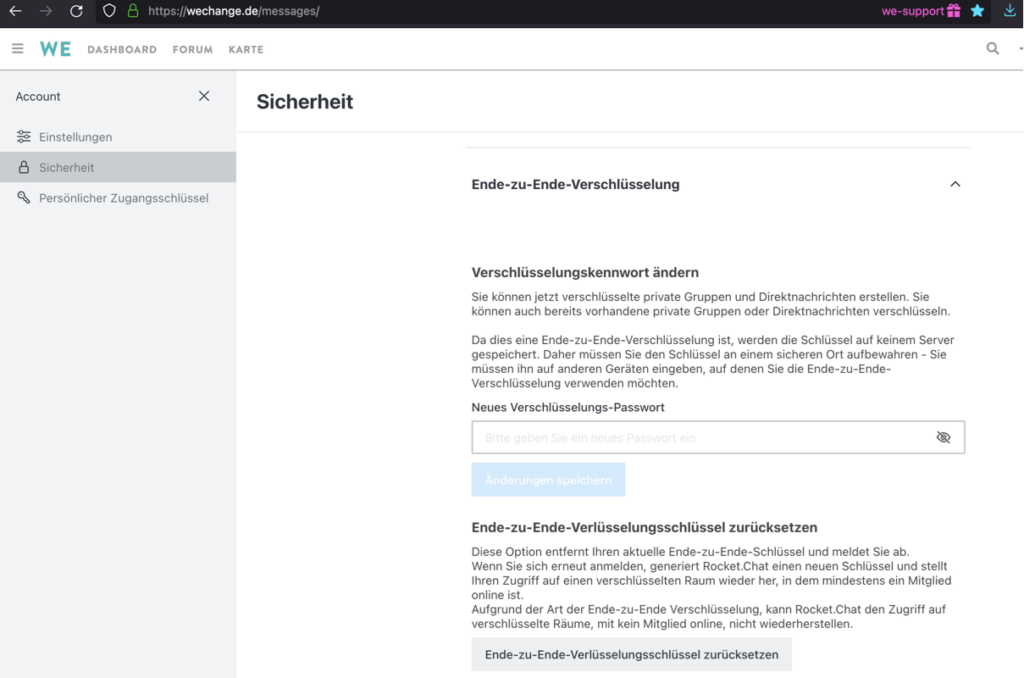
If you have problems with E2E encryption, you can reset it here. You will then be logged out of the chat server and can log in again by clicking on "Enter chat".
A new encryption password will now be displayed here. You should remember/save this. Alternatively, you can change it.
06. Nextcloud
Nextcloud is probably the best open source software for storing, sharing and editing files. The cloud service has been integrated into WECHANGE since 2019. This means you can not only make use of the file hosting and file sharing functions, but also use OnlyOffice: Online editing of documents, spreadsheets and presentations offers comparable convenience to Google Docs and Co.
Admins of groups and projects can enable the cloud via the settings. This creates a folder that is automatically shared with all members. You can access your folder via the new widget on the group/project dashboard, which also shows the most recent and the total number of all your cloud files.
Each user has 100 MB of personal storage available on our platform. This only applies to files that you upload to the cloud outside of all group and project folders (i.e. files that are located directly on the top level at https://cloud.wechange.de/apps/files/ or in folders created manually here). Files within automatically created group and project folders pay not to these 100 MB. You can see how much storage you are using at the bottom left of Nextcloud.
For all WECHANGE groups and projects in which the cloud is activated, a group/project folder is automatically created. These are always called “G - group name” or “P - Project name". In each of these folders, you have 1 GB of free space available. All files within such a folder contribute to this 1 GB of storage space, regardless of which member uploaded it. So you share this within the group/project.
If you have fully used up the storage space, you will receive the following message.

We can unlock more storage space for you. Simply write a message to us with the name of your group/project and then we will do it. For each additional GB we would like to charge 1 € per month. You can do this quickly and easily under "Your Contribution" adjust.
Nextcloud Client
Yes, that is possible. Nextcloud supports the so-called WebDAV protocol. This allows you to synchronize the cloud folders with local folders on your PC so that they are always identical. When someone uploads a new file to the cloud folder, it is automatically downloaded to your PC, and when you drag a file to your local folder, it is automatically uploaded to the cloud folder. This also works with smartphones and tablets through mobile apps.
- Install the Nextcloud client for your operating system: https://nextcloud.com/install/#install-clients
- Enter “nextcloud.wechange.de” as the server address.
- Confirm access in the browser window. You may have to enter your login details for wechange.de.
- Switch back to the desktop client and select which folders you want to synchronize.
You can find detailed instructions here: https://docs.nextcloud.com/server/19/benutzerhandbuch/files/access_webdav.html
Other WebDAV clients
You can also connect to Nextcloud using another WebDAV client. To do this, you first need to create an app password in Nextcloud. To do this, first navigate to https://nextcloud.wechange.de - click on your profile picture in the top right and then on Settings in the menu. Then click on Security in the menu on the left.

There you can create a new app password under Devices and Sessions by first entering a name for the application (e.g. WebDAV) and then clicking on create.
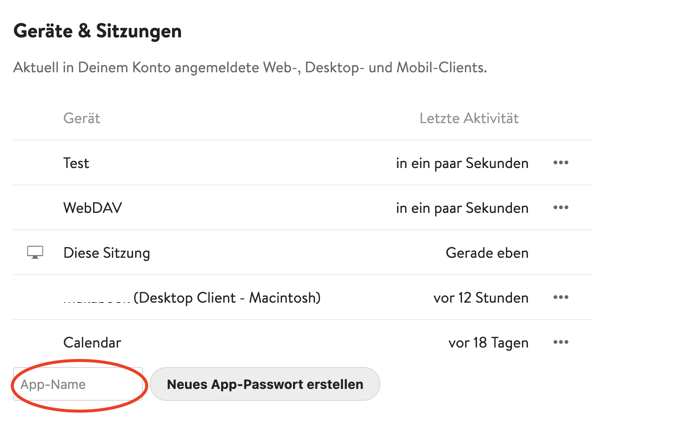
Once created, you will see your own username, which you must use to log in, and your password. It is best to save it in a password manager or in a location of your choice.

Now you only need the address you want to connect to. To do this, navigate to the Files app in Nextcloud and click on Settings at the bottom left. Your WebDAV address will then be displayed there.
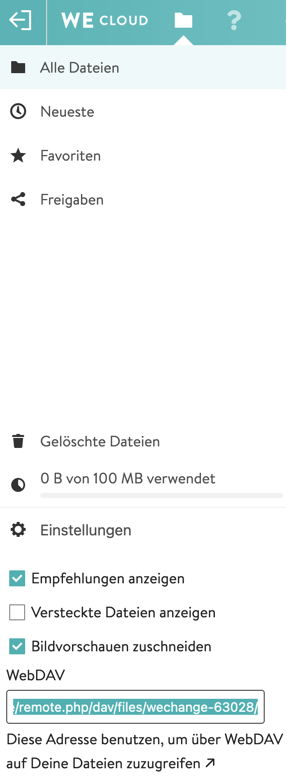
Then open the WebDAV client of your choice (in macOS, for example, the Finder and then in the menu at the top under “Go > Connect to Server”) and enter your data there.
Address: https://nextcloud.wechange.de/remote.php/dav/files/wechange-deine-nutzer-ID>/
Username: wechange-your-user-ID
Password: The password you created as described above
Now you will find a new drive nextcloud.wechange.de
You have two options. From anywhere, you can jump to the cloud using the cloud icon in the header menu. You will land in your main directory, where your folders are displayed. These are usually the folders of your groups and projects in which the cloud is activated. Alternatively, you can jump to the cloud via one of these groups and projects by clicking on the cloud button or widget on the dashboard. In this case, you will land directly in the group/project folder.
Navigate to the folder in which you want to create the content. Now click on the plus symbol at the top and select "Document", "Table" or "Presentation". Alternatively, you can upload a file, e.g. in .docx, .odt, pptx, etc. format. When you open the file, an editing view appears, as you know it from Word, Excel or Powerpoint, for example. You and other users can edit the file, even at the same time. All changes are saved immediately and automatically.
Since we use the community version of OnlyOffice, editing documents only works in desktop browsers and not on mobile devices.
If the cloud is activated in the group/project (see above) and you upload a file to the corresponding cloud folder, all members of the group/project automatically have access to the file.
You can also generate a link that allows members to go directly to the file. To do this, click on the sharing icon next to the file name. Now click on "Internal link" or the symbol next to it to copy it to the clipboard.
You can share cloud files and folders with individual WECHANGE users who are not in your groups and projects, as well as with other, even multiple WECHANGE groups and projects.

To do this, open the share menu (3 dots connected by two lines) of the folder or file and enter in the text field the name of the WECHANGE profile/group/project. Other groups and projects will only be suggested to you if you are a member of them. So if a user wants to share a folder with two different groups/projects, they must be a member of both.
Once you have typed in the name, suggestions will be shown. Select the correct one. The profile/group/project will then be shown in the list of users with access. By clicking on the three-dot menu next to the name, you can Customize permissions.
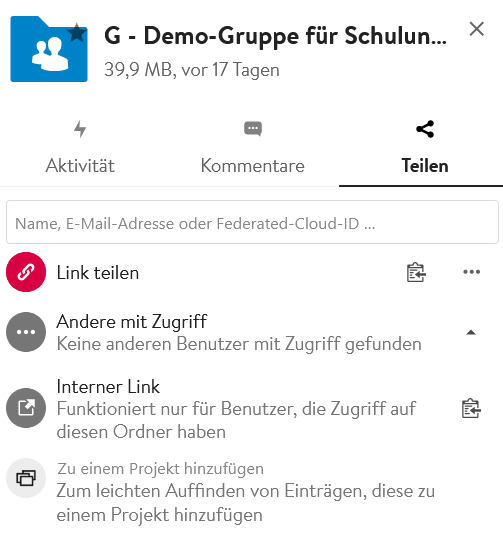
Yes, you can share files and folders with users outside of your groups and projects, and even with people who are not registered on wechange.de. To do this, click on the sharing icon next to the name of the file or folder. Now click on the plus symbol next to "Share link". The sharing link is now in your clipboard and you can send it.
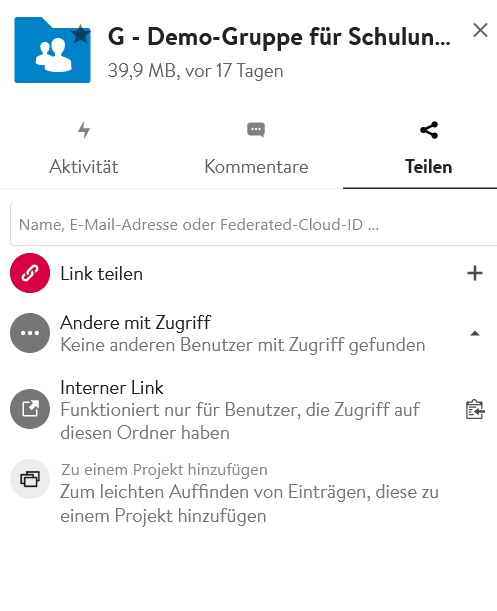
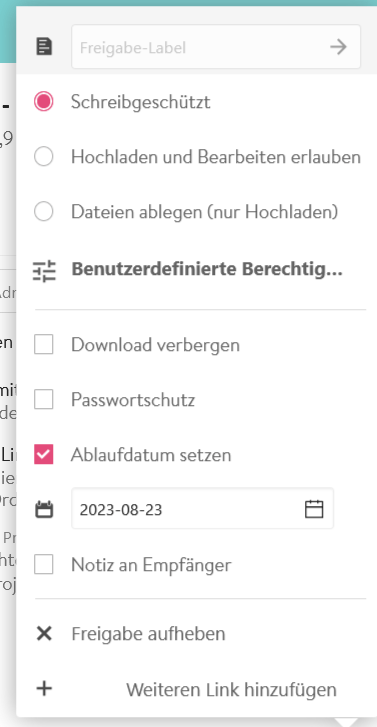
To adjust the sharing conditions, you can click on the three-dot menu that now appears.
By checking the appropriate box, you can share individual documents, tables or presentations with the Allow editingso that the other person can not only read the file but also edit it. For security reasons, we generally recommend setting an expiration date of a maximum of 30 days and password protection.
When sharing folders, it is not possible to create a link that grants external users editing and upload rights for the folder for data protection reasons. However, folders can be shared in this way for registered users and other WECHANGE groups and projects (see FAQ 06.08).
Yes, that is possible. To do this, check the box for "Allow editing" in the sharing settings (see above). We strongly recommend setting an expiration period of a maximum of 30 days for the link.
All three functions allow you to edit text online and collaboratively. However, there are some differences in the details, so it's a matter of weighing up the options you choose.
- OnlyOffice document: This gives you the most functions. The editor is based on programs like Microsoft Word or OpenOffice/LibreOffice. However, the loading times are also longer. If you just want to write a text together and don't need a fancy document, you can use one of the other two functions
- Markdown text documents: Compared to OnlyOffice, you have fewer functions here, but they are still sufficient in most cases. The document also loads faster and doesn't seem as overwhelming. The toolbar shows all available formatting options that correspond to classic Markdown.
- Pads (Etherpads): Before Nextcloud was integrated, there were only the pads. Like the classic file storage, the pads will remain because they are very practical. The range of functions is comparable to that of Markdown text documents. The loading time is also short. In addition, you can mark selected text passages, view previous versions and use the author colors to see who wrote what. However, you can only share pads in read mode and not in edit mode for people who are not registered on wechange.de.
Yes, you can. Simply drag and drop the folder into the browser window to upload it. If you want to download a folder, click on the three-dot menu in the folder row and then on "Download".
In addition to files and OnlyOffice, Nextcloud offers many other apps that can be used to create calendars, to-do lists or chat rooms, for example. In general, we are cautious about installing additional apps because we do not want to increase the complexity of the platform any further. However, since many users Nextcloud Decks and the Nextcloud calendar requested, we have installed them. However, the two apps are only activated for those groups and projects that have explicitly requested this. We would like a Pay-As-You-Like contribution of €5 per app from you (see "01. Voluntary contribution payment"). If you also need one of the two apps (or even both), then write us an email at support@wechange.de
You can also send us your requests for more Nextcloud apps, but we cannot promise that we can fulfill them.
We use the free OnlyOffice integration to enable file editing in the cloud. Currently, only desktop browsers are supported. If you see an error message in your mobile browser
“In the free community version you can only open documents, for editing in mobile web editors the commercial license is required”,
switch to a desktop browser.
Since we want to continue to offer the use of WECHANGE free of charge, we cannot offer support for mobile editing.
Optional
At wechange.de we offer you the option of using the Nextcloud Calendar App. For this we would like a contribution of €5 per month to support the operation and further development of our platform.
Using and connecting to the Nextcloud Calendar app is only possible after the app has been activated.
CalDAV clients
You can also connect to the Nextcloud calendar using a CalDAV client. To do this, you first need to create an app password in Nextcloud.
Create password
To do this, first navigate to [we_faq_nextcloud_security_url].
There you can create a new app password under Devices and Sessions by first entering a name for the application (e.g. Calendar) and then clicking on create.
Once created, you will see your own username, which you must use to log in, and your password. It is best to save it in a password manager or in a location of your choice.
server address
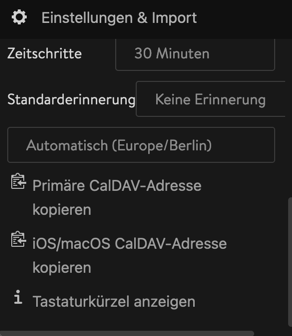
Now you only need the address you want to connect to. To do this, navigate to the Calendar app in Nextcloud and click on Settings & Import at the bottom left. Your CalDAV addresses will then be displayed there for you to copy.
Then open the CalDAV client of your choice (in macOS, for example, the calendar, in Windows, for example, the Outlook calendar) and enter your data there. It looks something like this:
Address: [we_faq_nextcloud_connection_url] (Windows) or [we_faq_nextcloud_url] (MacOS, iOS)
Username: [we_faq_organisation_name]-your-user-ID/username (see above)
Password: The password you created as described above
Now you will find a new calendar from Nextcloud.
Problems?
You may be asked for a password during the Nextcloud settings itself. If this is the case, simply log out of Nextcloud and log back in. This will solve the problem.
Android
To connect your Android device to the CalDAV of our Nextcloud, we recommend the app OpenSync from the PlayStore
Our Nextcloud currently does not support sharing with email addresses. Due to data protection concerns, we have not currently activated this function.
When performing some actions in Nextcloud, the site may ask you to enter a password with the “Authentication required” popup.

However, your profile password will not be accepted (Nextcloud is connected to the portal via single sign-on and does not know your wechange.de password from the portal itself). The only way to carry out the planned action is to bypass the "Legitimation required" step. To do this, you must log out of your profile from the cloud, using this method:
Then you log in again directly with the same profile. If you now carry out the same action again, you will no longer be stopped by the "Legitimation required" pop-up, but you can carry out the action.
07. Microsite
The microsite is the publicly visible welcome page of every project and group. It is publicly visible and is displayed to users who are not (yet) members of the group or project. The microsite information is also displayed when you view a group or project via the map or overview.
Here you can present yourself to external parties and introduce yourself with the most important information (logo, description, contact, location, topics, etc.). However, all information except your name is optional. So you don't have to reveal more than you want to.
[we_faq_yt_microsite]
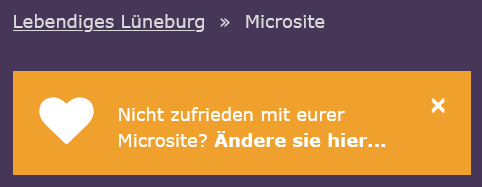
As an admin of your group or project, you can set which information is displayed. You can access the group or project menu microsite where you as an admin will see the suggestion “Change it here…“ is displayed, or you can go directly to the Settings and then in the tab microsite.

By default, the microsite only shows the information that you have stored in the settings. In addition, selected news, events, pads, surveys or files can also be displayed for visitors. The prerequisite for this is that the visibility of the respective content has been set to "Public".
In addition, the microsite settings must specify what type of content should be displayed on the microsite when it is publicly visible.

08. Calendar (events, appointment scheduling and video chat)
Every group and every project has a calendar. Here you can not only enter fixed appointments for your team, but also - like with Doodle - vote on appointments. You can also start a video chat directly in an event to hold digital meetings. You can also subscribe to the calendar with your smartphone or PC calendar.
In the middle of the group or project dashboard you will see the small monthly view of the calendar (if this is not displayed, the calendar is deactivated in the settings and must be activated there by an admin). Even in the small view you can click on a day to enter an event, but you can also switch to the full-screen view by clicking on "Events". Once you have clicked on the day of the event, a form will open in which you can enter all the necessary information. Don't forget to press "Create" at the bottom at the end.
Here you can find the corresponding explanatory video.
Only the creator and the admins can subsequently change or delete an event. To do this, open the event and click on the symbol with the down arrow in the top right. Then select "Edit" or "Delete". Don't forget to save!
In the event editing mode, click on "Show additional options..." at the bottom and set the visibility. You can also share public events with non-registered users via the link and they will be displayed on your microsite.
If you want your event to be visible to the entire WECHANGE community, you should (additionally) add it to the forum calendar.
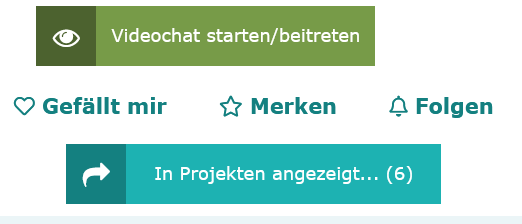
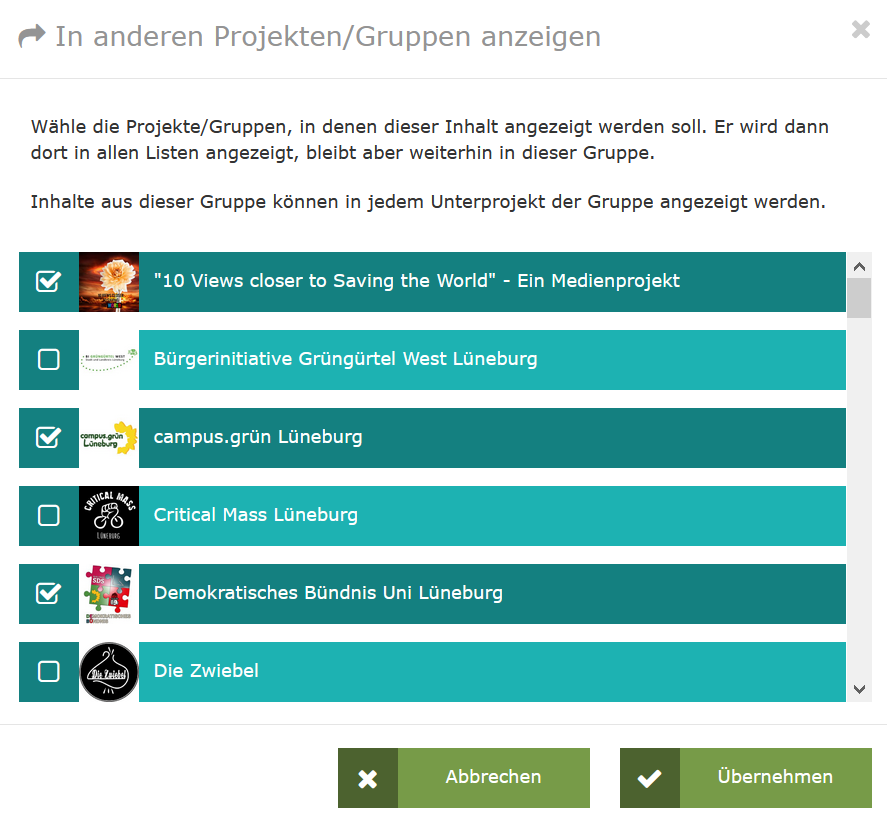
Unfortunately, events cannot currently be transferred without restrictions and must be created manually in many cases. The only exception is the transfer of events from a group to a subordinate project or from the forum to a group/project of which you are a member.
In both cases, you can open an event and then see the button "Show in projects...". Here you can select where else the event should be displayed. Transferring from a project to the parent group is currently not possible.
Unfortunately, there is currently no function for this, but we are looking into it.
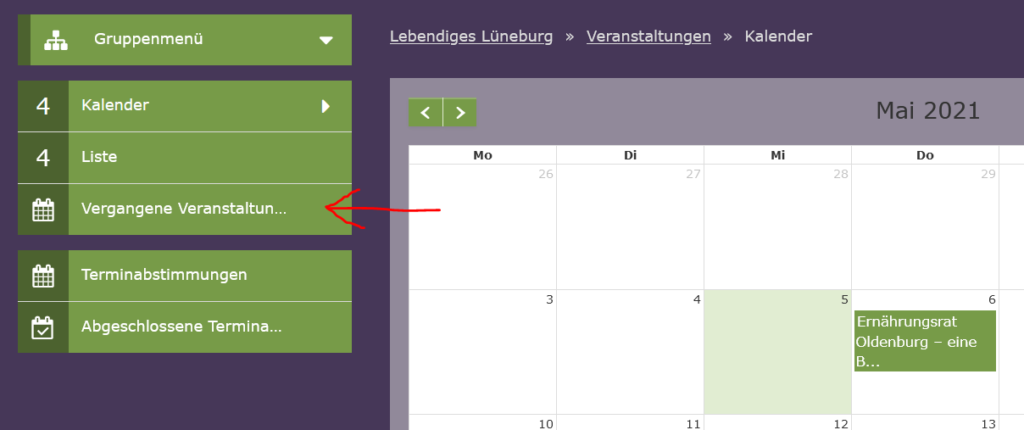
Past events are not displayed in the classic monthly view. To see them, you have to open the calendar in full screen mode (by clicking on "Events") and then select "Past events" in the left side menu. These are now displayed as a list.
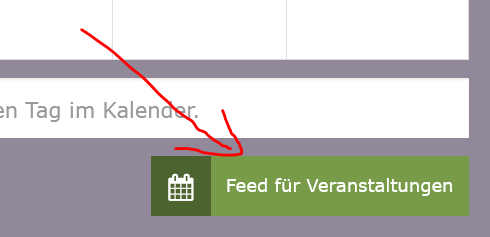
- Open the calendar in full screen view by clicking on “Events”.
- Click on the “Events Feed” button at the bottom right.
- Copy the URL that is displayed. This is the iCal feed. If you only want to display the public events from your calendar (e.g. on your website), delete the "?user=123&token=xxxx" part of the URL, i.e. everything after the last /.
- Switch to the calendar program of your choice.
- Subscribe to the calendar from WECHANGE using the iCal feed you copied. The steps vary depending on your calendar program. It's best to search on Ecosia for something like "Subscribe to Outlook iCal feed" and follow the instructions you find.
Synchronization currently only works in one direction: you can transfer a calendar from WECHANGE to another program. Conversely, you cannot automatically transfer external calendars to a WECHANGE calendar.
In the group or project overview, click on “Events” and then on “Appointment Coordination” in the left-hand menu bar. A new page will open where you first enter the title.
You can enter all the information you need in the form that opens. First of all, you select the date suggestions that you want to vote on by selecting the days in the datepicker calendar and then entering the respective times. You can add multiple date suggestions on one day by clicking on the day multiple times. Don't forget to click "Create" at the bottom at the end.
All members of the group or project will be notified of the new date. Nevertheless, it can't hurt to send them the link again just to be on the safe side. They will see all the suggestions in a row and can answer "Yes", "Maybe" or "No" to each one. The votes will be added up automatically and the date that fits best will be shown below.
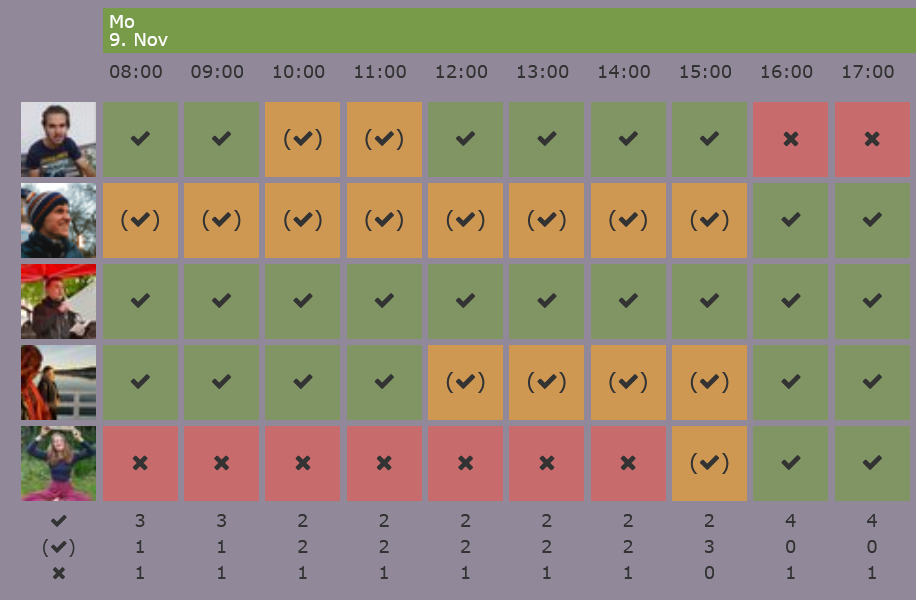
Once everyone has voted, the creator or an admin can end the vote and automatically enter the favorite date in the calendar. In edit mode, an appointment vote can also be set to be publicly visible. Then all users registered with wechange.de can vote, not just the members of the group or project. However, non-registered users cannot vote.
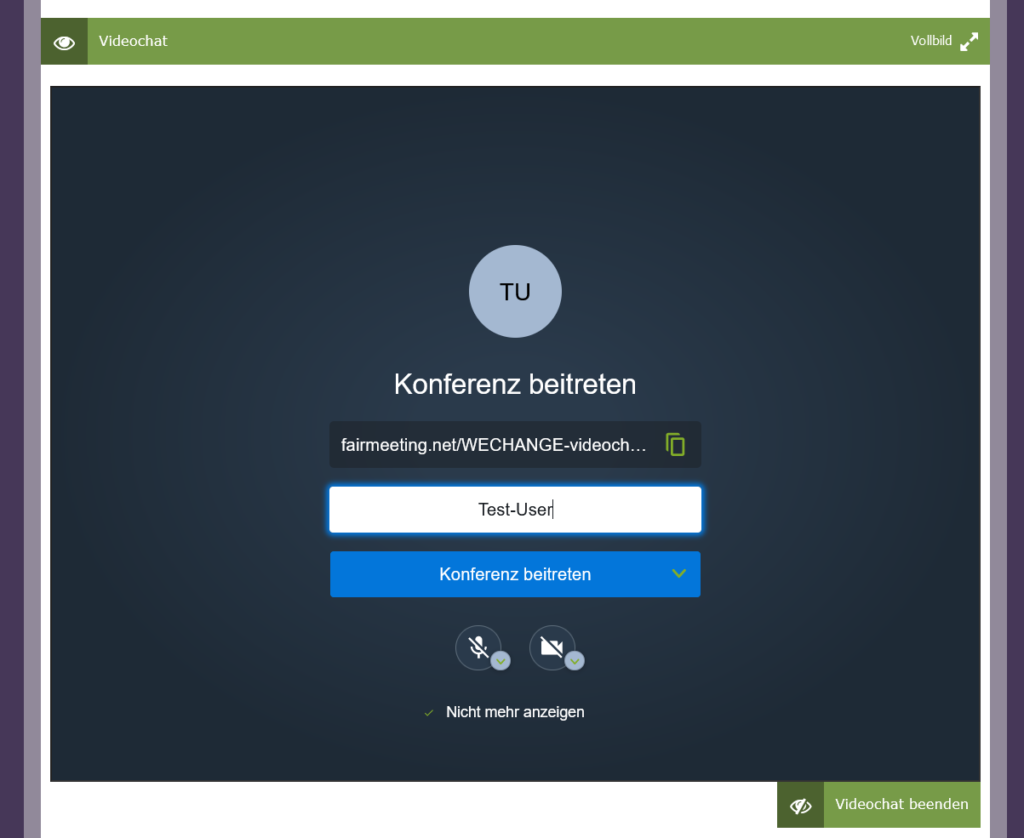
The video chat function is a bit hidden. To use it, you first have to create a new event or open an event that has already been registered. Now click on the "Start/Join video chat" button at the bottom of the event page. The video chat opens directly on the page. First you have to enter your name and confirm that you want to share your camera and microphone. Now you can see and hear the other members who have joined the same meeting. You can also invite external people by copying and forwarding the conference link (user icon bottom right).
However, if there are too many users, the program can reach its limits. If everyone has their microphone and camera on, the load limit can be reached even with a single-digit number of participants. It is therefore best to turn off your video if you have larger meetings. Tip: You can use the three-dot menu and "Quality Settings" to set the quality to "Low resolution" to reduce the load. The "fairmeeting" service, which is based on the open source software "Jitsi", is used for the video chats. Accordingly, you can also share your screens and chat parallel to the meeting. Your meetings are tap-proof and compliant with data protection regulations.
09. Pads and Tables
Pads are online documents that you can edit in parallel and in real time. Instead of having to download, change, save and upload a text document again, you can create and change it directly in the browser, even with multiple users at the same time. Saving is always automatic. This means that you as a team don't have to keep track of different versions, but you are always all up to date. There are also online tables that work according to the same principles.
- On the group or project dashboard, you will see a tile with the heading “Recently edited pads” (if this is not displayed, the pads are deactivated in the settings and must be activated there by an admin).
- Click on the heading to go to the full screen view. Here you can see your folder structure, if you have created one, or otherwise all the pads you have created so far in a list.
- Enter a title above and choose whether you want to create a pad (text document) or a table.
- On the next page you can adjust the settings, but in most cases you can skip this step and come back later if necessary (via Settings).
- The pad or table is now displayed and you can start editing. All members are notified and the pad is displayed among the most recently created ones in the group or project dashboard.
Pads (not tables) have the so-called timeslider function. The clock symbol takes you to a view with a slider that allows you to travel backwards through time. There is no function to reset your pad to an earlier state, but you can copy the content of an earlier version, switch back to the regular view and replace the current content with the earlier one. The author colors will be lost in the process.
- Open the pad you want to export.
- Click on the icon with the two arrows.
- Under “Export current pad as”, select the “Etherpad” format and save the file on your PC.
- Switch to the group/project where you want to import the pad.
- Create a new pad.
- Do not change the content, but click on the symbol with the two arrows.
- Click on "Browse", select the Etherpad you just exported and click on "Import Now". Done!
There is no “Save” button because pads and tables automatically save all changes in real time.
To return to previous versions, there is the "version history" function (click on the clock symbol) (only for pads, not for tables). This allows you to access previous versions using a timeline. You also have the option of marking versions using the star to make them easier to find in the timeline.
By default, all members of the group or project can access and edit pads and tables created in it (once you are in read mode after opening the pad/table, you must click on "Edit").
In the settings (directly when creating or later) you can adjust visibility settings (first you have to click on "Show additional options"). "Only me" means that only you can see and edit the pad/table. With "Public" everyone who has the link can see the pad, even if they are not registered on wechange.de. The pad will now also be displayed on your microsite (unless this is deactivated in the microsite settings). Public pads can also be edited, but only by users who are registered on wechange.de.
Each person who edits a document automatically receives their own color, which is used to highlight their own entries. This makes it possible to recognize who wrote what. You can change your own color by clicking on the user icon (you can also enter your name here). You can use the gear symbol in the menu bar to set whether the author colors are generally hidden or displayed. You can also use the symbol with the crossed-out eye to permanently remove the color background for a marked section or for the entire document and set everything to white.
You create pads and tables within your group/project on wechange.de, whereas under "Files" you can upload content that you have saved on your PC (you can also save URLs here). The biggest difference is that pads and tables are edited directly online in the browser. To change a file, you have to download it, edit it, save it and upload it again as a new version.
Since the integration of Nextcloud, you can now create not only online documents, but also tables and presentations. For documents, you can choose between OnlyOffice and Markdown.
OnlyOffice documents have significantly more formatting options than pads. They are reminiscent of Word documents or Google Docs (but the loading times are longer). You can also share OnlyOffice documents - just like all cloud content - with non-registered users so that they can not only view them but also edit them (public pads, on the other hand, only allow non-registered users access in read mode). On the other hand, pads have the advantage that you can comment on selected text passages. In the end, it is a matter of weighing up what you decide to do.
The situation is very similar with Markdown text documents in the cloud. These are even more similar to Pads in terms of functionality (in Markdown documents you can also insert checklists and images, and in Pads you can comment on them).
A general advantage of the cloud is that online documents and tables are located in the same folders as other files, whereas on wechange.de even the pads and files need a separate folder structure.
The online documents are based on the open source software "Etherpad", which is constantly being developed further. The online tables are generated in a similar way using "Ethercalc". Both have their own servers. The documents and tables are embedded as an inline frame in wechange.de so that you can edit them directly in the same interface.
10. Files
All groups and projects offer you a file storage. This is extremely simple. You can upload files or entire folders so that other members can download them. This gives you access to a shared file directory. You can now also store links.
Read more in this YouTube video.
- In the group/project dashboard, click the “Files” button.
- Optional: Navigate to the desired folder or create a new one.
- Drag and drop the file(s) or folder into the tray or click "Browse" and select the file(s) from your local directory.
In principle, any file format can be uploaded, for example PDF files, images, etc. Whether other users can open and view them depends on whether they have the appropriate programs installed.
Yes, it is also possible to upload folders along with the subfolders and files they contain. At the same time, you can also download entire folders. To do this, open the folder and click on "Download this folder" at the top. You then have to unpack/extract the downloaded ZIP file (there are instructions for this on the Internet).
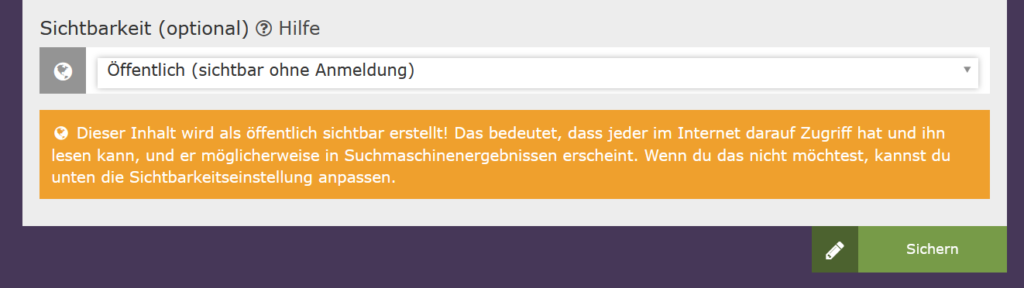
As an admin or creator, you can set who has access to a file. To do this, click on the "down arrow symbol" to the right of the uploaded file and select "Edit". You can then change the visibility using the globe symbol at the bottom. Public files are also displayed on your microsite (unless this has been deactivated in the microsite settings). Anyone who has access can open, read or download files. However, only admins and the creator can rename, move or delete a file.
Before Nextcloud was integrated, there was only the classic file storage. In theory, this would no longer be necessary because the cloud has more functions, but you can still use it if you want. You can find out what the additional functions of Nextcloud are in the relevant section in this FAQ (or you can find out for yourself by trying it out).
With the introduction of free groups, we have also given you more storage space. You can now use up to 2 GB for your project or group for free (this only applies to file storage and not to Nextcloud; there you only get 1 GB for free and more storage space for an additional charge, see the relevant section in this FAQ).
We want to offer WECHANGE to all users at a fair price. If storage space is used very intensively, we therefore have to charge fees. At the moment, we have not established a process for this, so storage space usage for projects and groups over 2 GB will remain free for the time being. If anything changes, we will inform you in advance.
11. Tasks
The tool allows you to create to-do lists in your groups and projects. You can specify individual tasks in a variety of ways, for example by setting a due date, assigning them to a member, creating a description or uploading attachments. All members can also comment on tasks.
You can find out more in this YouTube tutorial.
All members of a group/project can create tasks by doing the following:
- On the group/project dashboard, click on “Tasks” (if the button and widget are not visible, an admin must first enable the tasks tool in the settings).
- Select an existing list or create a new list by entering the list name.
- Then enter the title of the task within the list.
- On the page that opens, you can enter more detailed information. Don't forget to click "Create" at the end.
12. Digital Conference Center
The digital conference center offers a place for several video conference rooms to be opened in parallel on wechange.de or in your portal, where conferences, meetings or project and group work with up to 250 people can be held. We use the proven open source technology from BigBlueButton™.
The conference center has various rooms that can be used in parallel. As in a real conference center, certain rooms can be opened for scheduled events, while others are available permanently. The conference center can be individually configured for each event. To ensure that everything runs smoothly, our support team is available during the setup and, if required, during the conference.
In most cases, you will receive a link from the organizers that you can use to join the conference.
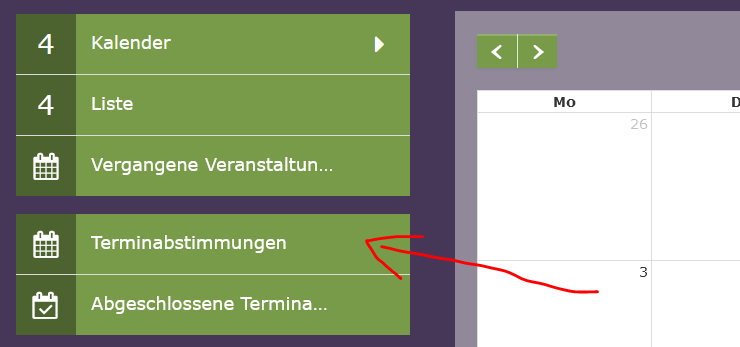
If you are already a member of the conference, you can access the conference via the three-bar menu under “my conferences” (see photo).
If you are the admin of the conference, you can also access the conference via the admin page: From the admin page of the conference, you can simply access the conference via the conference menu and then via the tab “meeting“ to view the conference.


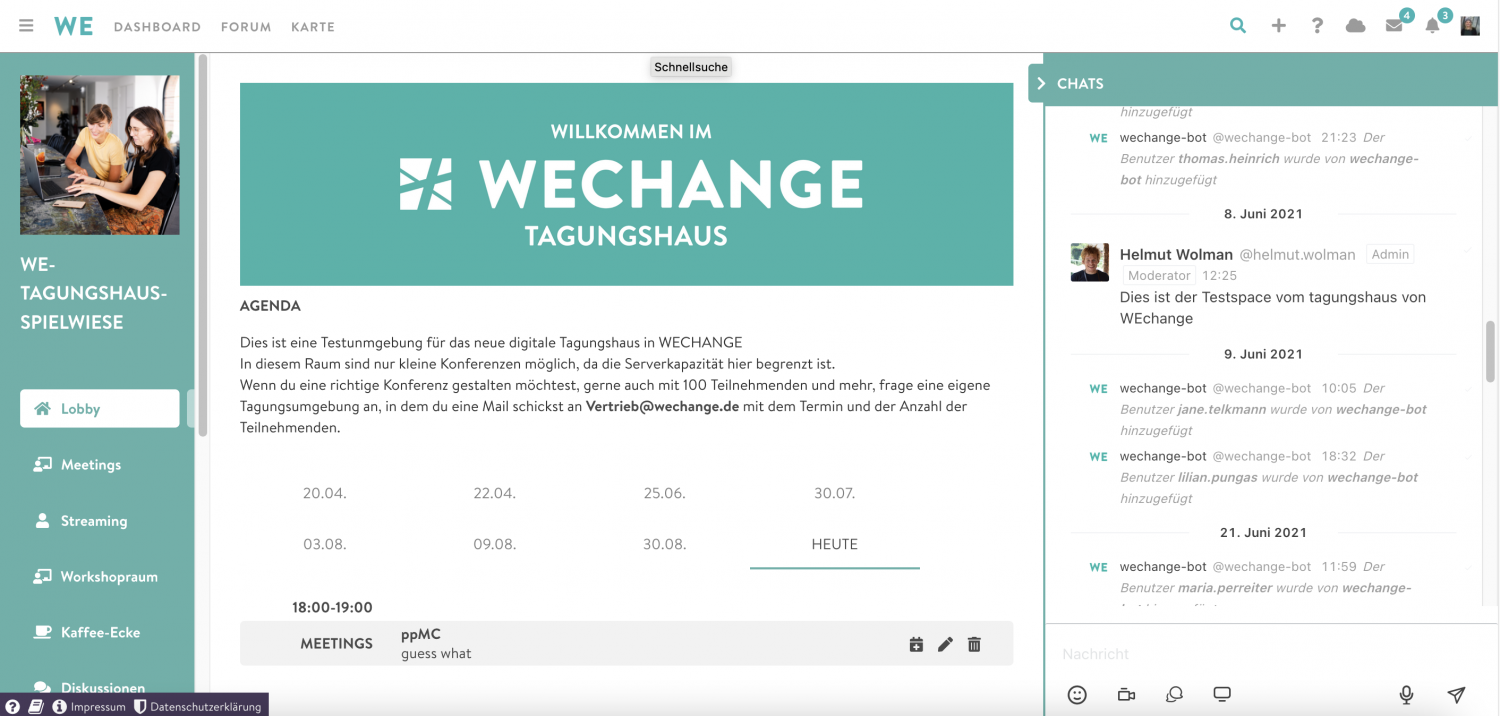
1. This is the title of the conference.
2. On the left you can see all the conference rooms.
3. Here you will find the description of the room you are currently in.
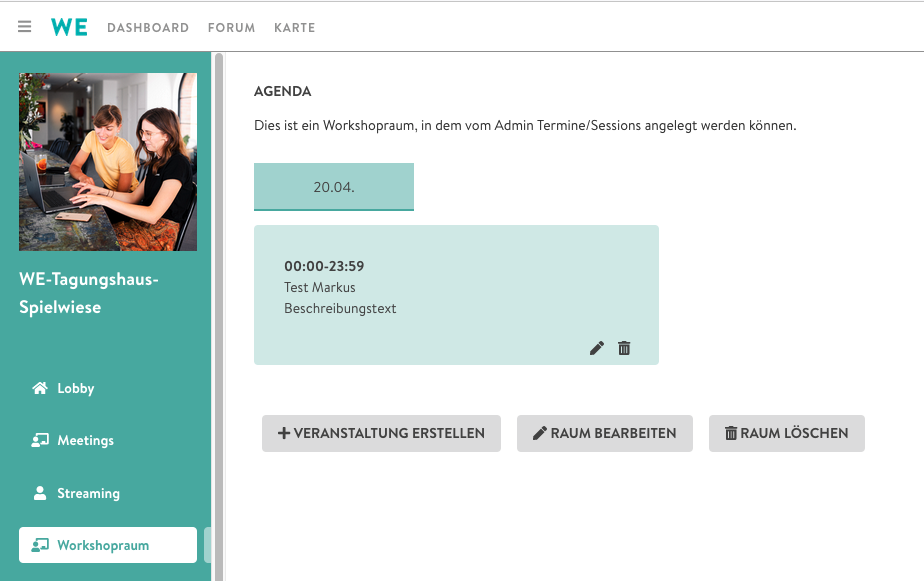
4. The agenda of the conference is displayed in the lobby. If you click on the individual events, you will be taken to the corresponding rooms.
5. In the chat you can write to the other participants.
In the lobby you will find the agenda of the event. On stage you can take part in video screenings.
Under meetings you will find all events created by the moderators.
In the room streaming you will find events that include a video stream.
The workshop room is just like the discussion room an example of rooms that can be created individually for each event. Here, for example, is a room where participants can come together for scheduled sessions. The sessions can be displayed in tiles or in lists. Administrators see tools in all rooms for creating events or editing the room.
In the coffee corner There are various rooms that are always open and are intended for relaxed exchange among participants.
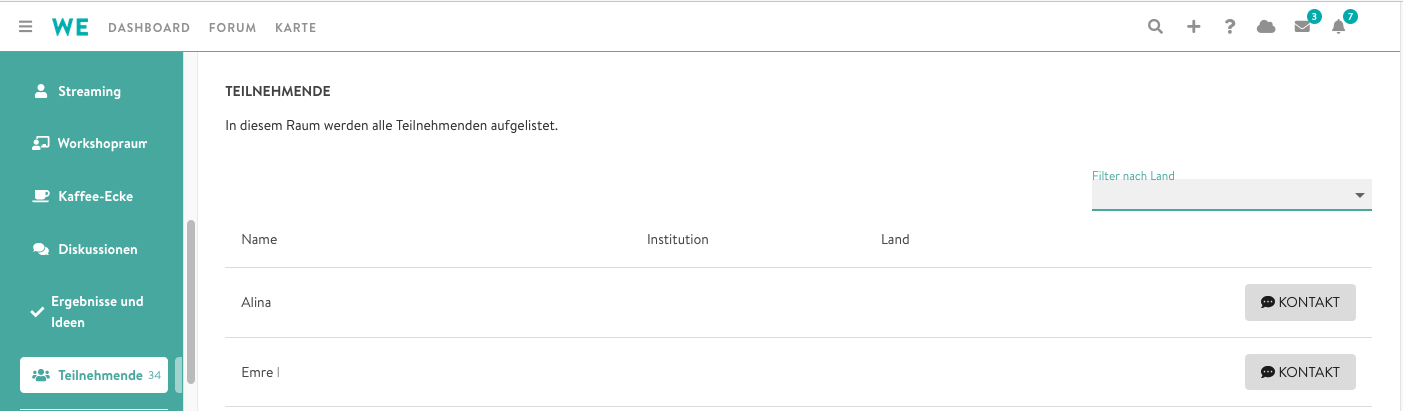
Under results and ideas you can share files with the other participants. You can see who else is taking part in the conference under Participants.
Under participants you can see all participants of the events, filter by category and contact them directly via chat.
If you click on a Event in a meeting, workshop, discussion or café room, then BigBlueButton opens in this room. If there are other people with an activated camera in this video conference, you can communicate with each other using sound and image.
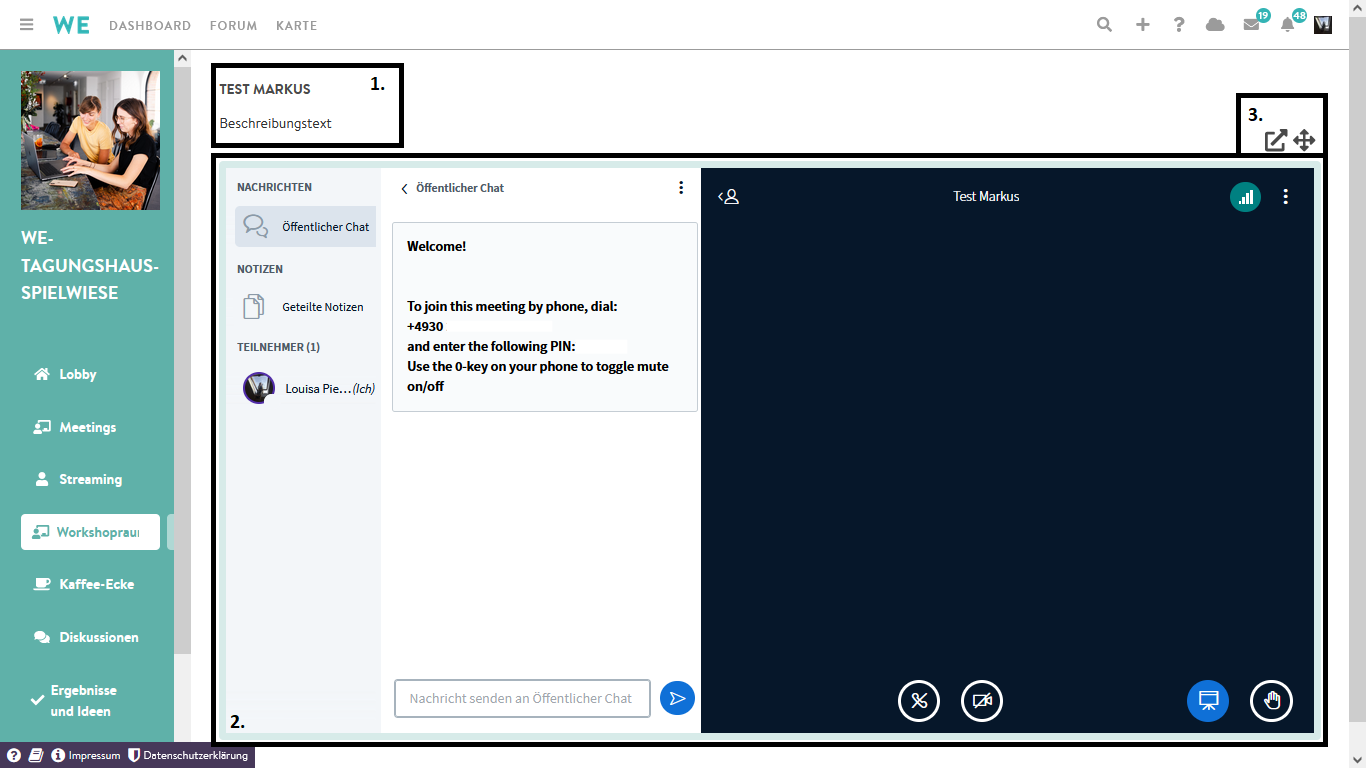
1. There you will see the event names and a description.
2. Here you are in the BigBlueButton video conference. Below you can activate or deactivate the microphone and camera, watch a presentation or raise your hand. Presenters can upload presentations and share screens with all participants. The connection status is displayed at the top right (here three green bars) - if it is red, the connection can be stabilized by turning off the video transmissions.
3. On the arrow to the top right you can enter the video conference in open a new browser tab. Click on the cross arrow to enlarge the video view (rooms on the left side are hidden, can be undone using the same button).
Outside of events, you can meet other participants in the café (a permanently open video conference room for all participants. May be named differently depending on the event) or write in the group chat.
If your internet connection is weak or your microphone is not working, you can dial into BigBlueButton conferences in the workshop, discussion or café room by phone if the organizer has activated telephone dial-in for this event. You can find the number in the top left of the video conference chat. If you do not have access, please ask the organizer or a participant to send it to you.
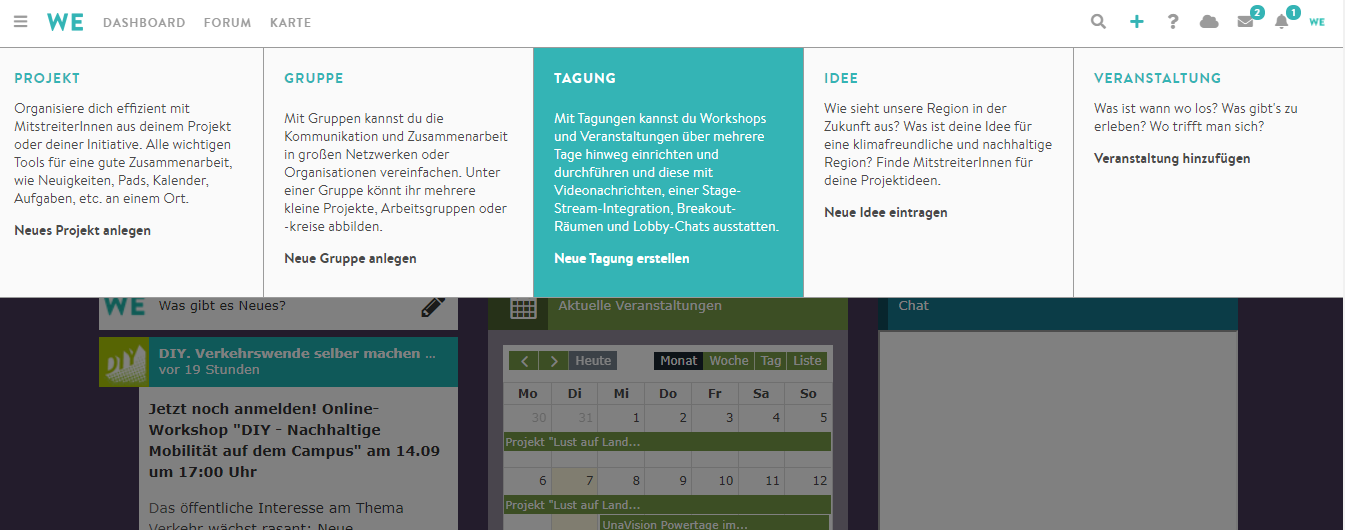
To start the creation process, click on the plus symbol in the top right of the menu bar and then on the "Create conference" tile. On wechange.de, conferences can only be created after prior booking/request. After booking your conference, you will be directed directly to the configuration page, where you can make all the basic settings for your event. In addition to the basic settings, you can also fill the conference microsite directly from here, but this is also possible afterwards (including editing the conference settings).
conference name
The conference name is mandatory and is visible to all participants within the conference and to outsiders via the microsite. Think of a short, concise title that describes your conference as well as possible.
conference start and end times
The start and end times of your meeting will be displayed on the microsite and will be the basis for reminder emails if you have created any.
type of application to participate
Here you can specify whether those interested in the conference have to fill out an application form, which you can create in advance. If you do not want a separate application form, then do not select this field. You can also set up the conference so that every portal user can take part in the conference. (As this can lead to unexpectedly large groups spontaneously attending your meeting, we only recommend this in certain cases)
Display in project or group calendars (optional)
If the conference is relevant for certain groups or projects, you can specify them here. The conference will then appear in the calendars of the relevant groups and projects (e.g. it would be conceivable to advertise a conference for which you are still looking for many participants in a specific group in which interested people have organized themselves or should organize themselves)
Description and information
The description of the conference is essential for the external presentation, so that interested parties can understand the content directly. Therefore, you should design it carefully and provide all the necessary information about your event. The description editor is based on the Markdown markup language, which you will use very intuitively once you have understood it. You can find information about this, for example, here.
contact information (optional)
How can you contact those responsible for the conference? In this field you can enter links as well as information such as address, telephone number, social media, etc. Attention: This information can be read by outsiders. The Markdown syntax also works here if you want to highlight something in particular, for example.
conference color (optional)
You can easily specify the primary color of your conference in hex format. Wikipedia For example, you can find some colors in hex format, alternatively you can simply search for “color picker” in a search engine and have your desired color converted.
Icon (optional)
The icon is the logo of your conference and is displayed to interested parties on the microsite and in search.
banner image (optional)
The banner will appear above the group name on the microsite, so it's best to choose a very wide format so that none of it is cut off (1140 x 240 pixels).
website (optional)
Does your conference also have its own website or would you like to link to a website where the event is announced? Then you can add a link to it here, which will be displayed on the microsite.
Relevant topics and keywords (optional)
Here you indicate which social issues will play a role during your event so that people who are interested in certain topics can find the conference more easily in searches and get an immediate idea of the content. Keywords can be used to narrow down the topic area even more precisely. Both are displayed on the microsite.
place or address (optional)
If a specific location can be assigned to the conference (e.g. you are streaming from Berlin), it can be entered here and will appear on the microsite.
Vrelated projects/groups (optional)
You may want to refer to friendly projects or groups that offer offers on the same topic, or even to your own. These will then be displayed on the microsite.
visibility
Make your conference publicly visible or only for certain groups of people.
Clicking on "Save" now creates the event. If you want, you can also create the microsite for the conference beforehand by scrolling up to the top of the form and clicking on the Microsite tab. However, you can also do this afterwards! Next, you should create rooms for the conference.
You enter a room in the conference center and click on the "Create event" button. On the configuration page, you can then upload the title, date, description, presenters and a presentation. It is important that you save the presentation as a PDF beforehand.
Currently, all participants need an account on the platform to take part in the conference. However, we are currently working on ensuring that external participants can also join the event via a link in the near future.
We have summarized all information about the digital conference center on a special FAQ page that helps organizers to use the digital conference center. This page can also be passed on to the invited participants so that they can quickly find answers to any questions. The FAQ page is called: https://wechange.de/cms/digitales-tagungshaus-faq/
13. BigBlueButton in groups and projects (Videconference Pro)
We do not have our own tutorial yet, but BBB is used internationally by many and accordingly there are some tutorials, for example this one on YouTube (6:30 min). In the video, some things look a little different than in our BBB, as we are already using a newer version, but it should be close enough to understand the basics. Nothing more than the basics are shown (if you know of a better/more recent tutorial, please let us know!). To get the most out of BBB, you have no choice but to experiment yourself and, best of all, read our FAQ, which gives a detailed insight.
BBB allows you to hold professional video conferences and make use of numerous options without your data being exploited by the questionable business models of large corporations. Instead, you can meet digitally easily and securely to take collaboration in your groups and projects to the next level.
Up to 100 people should be able to participate in a meeting, as long as not everyone shares their camera. The exact upper limits vary depending on the current server load. If you test the limits, please let us know how many participants and cameras your meeting was able to handle and when problems started, we would be happy to hear from you!
In order to use BBB, a person from your group/project must request activation. We have created a form for you that explains all the other points: https://wechange.de/cms/bigbluebutton/
After we have activated BBB for you, it should appear directly in your group/project dashboard. To deactivate it again or change the settings, navigate to the "Embed video conference" item in the group/project settings (requires admin rights).
For the use of BBB, we charge you a monthly flat rate of €5 per group and project in which we want to use BBB. This means you can use BBB in your groups and projects as often and with as many participants as you like.
The reason we do not make BBB available for free for all groups and projects is because the meetings cause a significant server load, which results in higher costs for us. Since not all groups and projects need BBB, we believe it is fair if those who actually want to use BBB pay for it.
After you have filled out the form on https://wechange.de/cms/bigbluebutton/ you will receive two emails from us: one email in which we confirm that we have activated BBB for you and send you some information about it, and an email with the invoice. You simply pay the invoice in the traditional way within 14 days.
Even if you have set up a Pay-As-You-Like post, the post will not collected through this method. Payments for BBB and Pay-As-You-Like run independently of each other.
After activation, you can use professional video conferences. The "Video conference" field will now appear at the top of your group/project dashboard. If you click on this, a BBB meeting will open immediately. All members of your group/project who now click on the "Video conference" field will end up in a meeting with you.
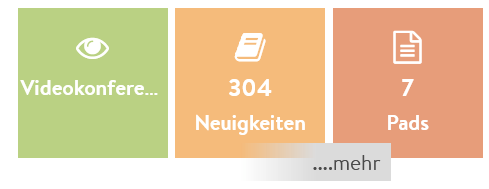
Alternatively, you can now choose whether to include a BigBlueButton meeting when creating an event. If you do this, the "Start/Join video conference" field will now be displayed in the event, which will open a BBB meeting specifically for this event.
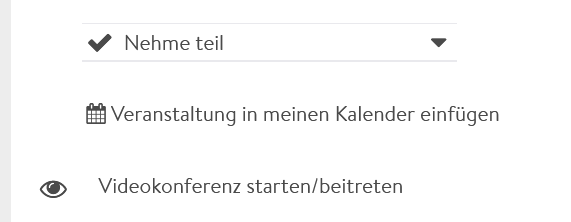
There can be various reasons for this. Maybe you are simply muted? Below you will see a microphone symbol. If it is crossed out, you are muted. Click on it and select your microphone if necessary. The same applies to the video icon directly next to it.
This is what it looks like when both microphone and webcam are activated:
If that didn't help: Sometimes it's due to the browser version. Try to see if it works with a different browser.
It could also be due to the audio and video inputs and outputs. In the audio or video settings (click on the small arrow next to the respective symbol) you can select which one you want to use. Try it with or without headphones. If it still doesn't work, you can also dial into the meeting by phone (see below).
You've probably minimized the presentation. Click the presentation button in the bottom right to show it again.
Presentation is displayed:

Presentation is minimized:

If you want to share your webcam: Deactivate webcam sharing by clicking on the camera symbol below. Click on it again to activate sharing. A window should now appear where you can select the quality. Select "Low" and then click on "Start sharing".
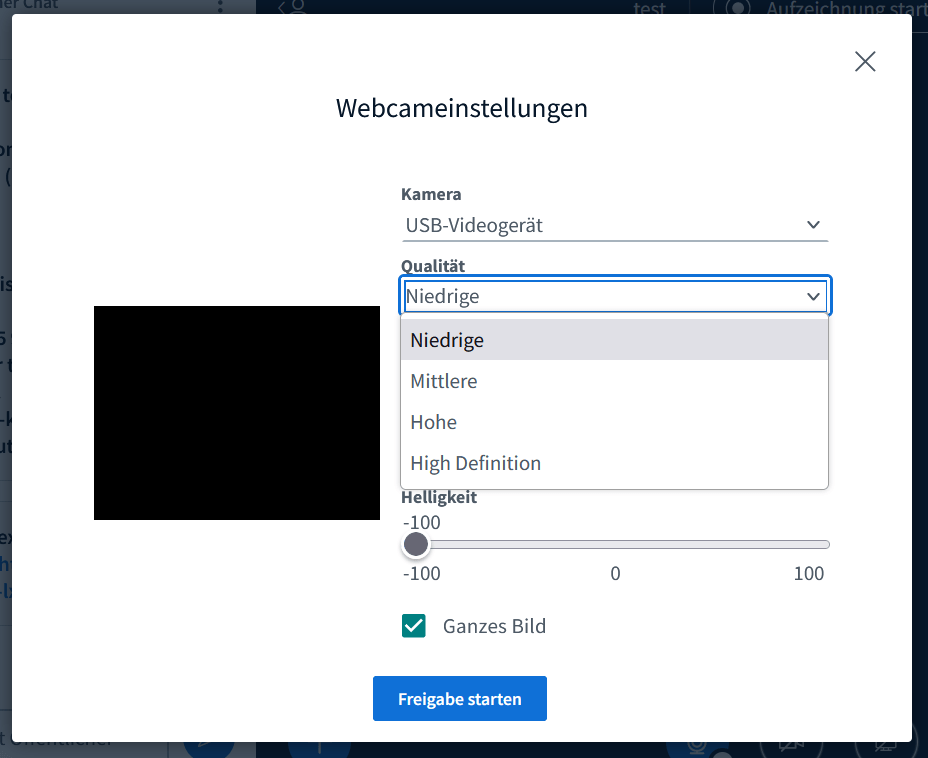
If that's not enough: Click on the three dots in the top right and then on "Open settings". Under "Data saving mode" you can choose whether you want to deactivate other people's webcams or screen sharing.
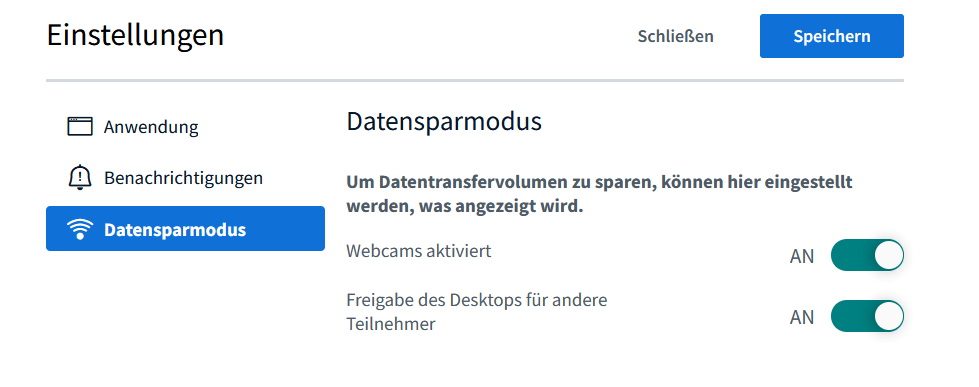
All participants can minimize our standard slide for themselves by clicking on the presentation button at the bottom right.

Alternatively, the presenter (see Question about roles and permissions) delete the slide for the entire room so that none of the participants can see it anymore. To do this, the presenter clicks on the plus button at the bottom left and then on "Upload/manage presentations". Here, click on the trash can next to the current presentation "default.pdf" and then confirm at the top right. The presentation is then gone and cannot be displayed again (unless you have downloaded it beforehand and upload it again).
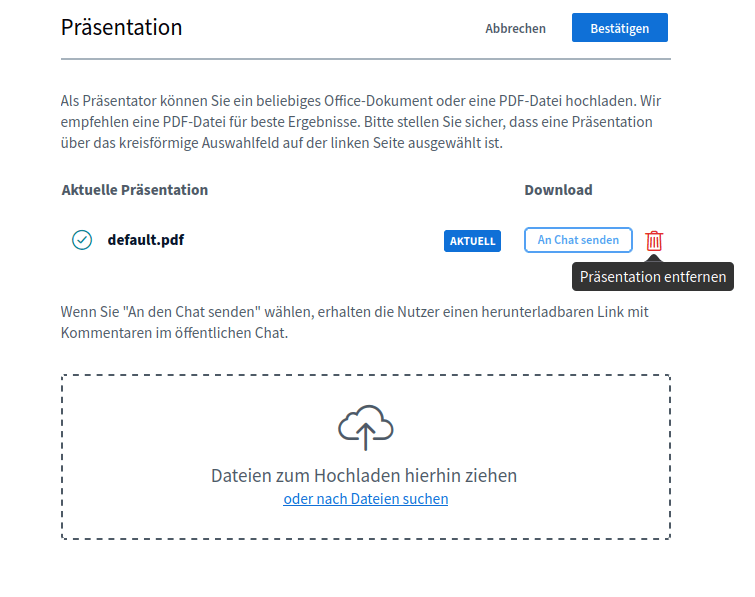
This deletion of the standard presentation only applies to the current meeting. As soon as the conference is ended (e.g. because all participants leave) and then restarted, the presentation is back.
You can also upload and show your own presentations, see here.
If you are the admin of your group/project, you can navigate to the settings via the group/project menu. In the "General" tab at the bottom, you can select whether the participants' microphone and camera should be activated by default when joining. You can also select whether recordings should be possible (see below for more information on recordings).

You can expand the list of participants using the person icon at the top left. Now click on "Public Chat", write a message and press Enter. Voilá!
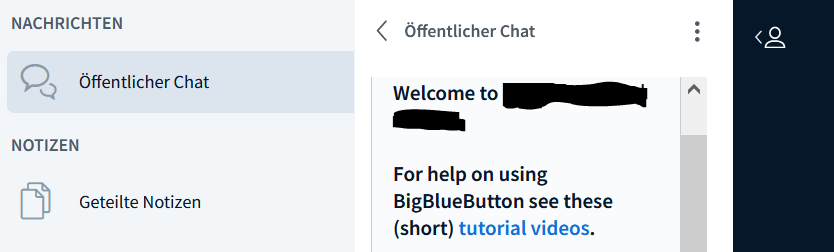
You're supposed to be careful during the meeting and not send each other secret messages, but it's still possible. Left-click on one of the people in the list of participants and select "Start private chat."

Above the list of participants is the "Shared Notes" field. All participants can write in it at the same time, e.g. to take minutes of the meeting. If you are familiar with Pad (i.e. Etherpads), this should be nothing new to you.
Watch out: Your shared notes will disappear once everyone has left the meeting, so make sure to back them up beforehand if there was anything important in them.
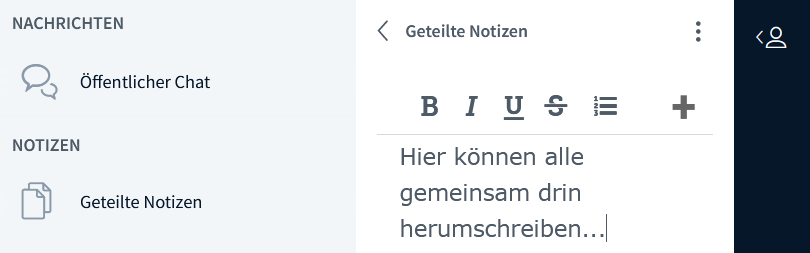
As the moderator of the meeting (see below for roles and permissions), you can also pin the shared notes to the whiteboard so that everyone can see them large, or convert the notes into a presentation to show the status of the shared notes at that moment (via the three-dot menu to the right above the shared notes). You can then no longer change the text in the presentation, but you can decorate it with the whiteboard tools (see below). The best thing to do is just try it out for yourself.
In BBB, only one person has the role of "presenter" (see below for roles and permissions). Only this person can share the screen. To do this, they will see an additional button below. If you click here as a presenter, you will be asked which window you want to share. Select a window, confirm your entry and you're done.
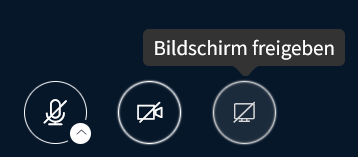
Participants with the role "Moderator" (see below for roles and permissions) can give (or remove) the role "Presenter" for themselves or others. If you want to present something, ask a moderator to make you the "Presenter".
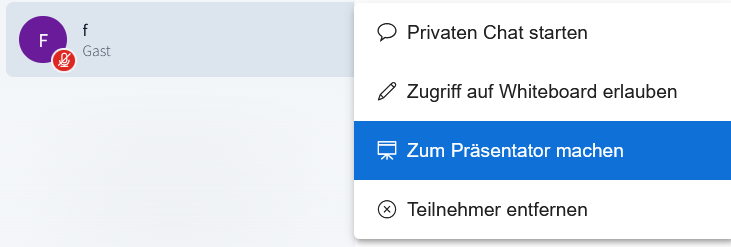
This is because you do not currently have the "presenter" role. In BBB, only one person can have this role at a time. Participants with the "moderator" role (see roles and permissions below) can give (or revoke) the "presenter" role to themselves or others. If you want to present something, ask a moderator to make you the "presenter".
At the bottom right you will see a button with a hand. If you click here, the moderators will see that you are raising your hand. Click it again to lower your hand again. Moderators can also lower your hand for you.
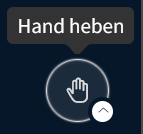
You can use status icons to express how you are feeling or what you think of something. You can set your own status in two ways:
1. Click on the small arrow next to the hand button at the bottom right.
2. Open the participants bar, click on yourself and select “Set status”.
In the participants bar you can also see the status of the other participants. Moderators can reset the status of individual or all participants.
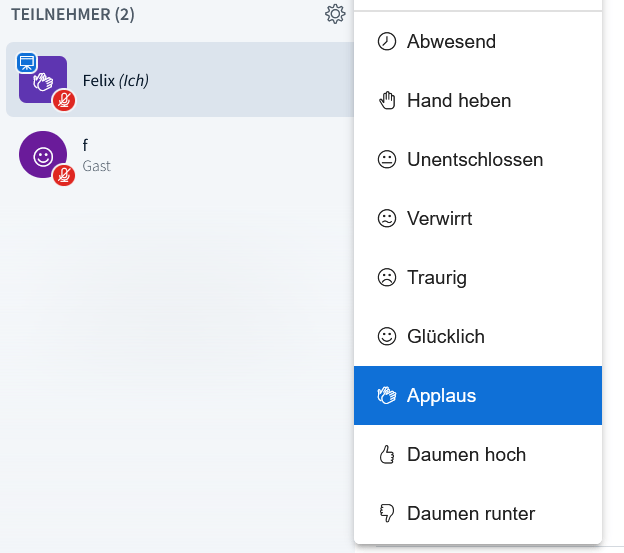
As a moderator (see below for roles and permissions), you can click on the gear in the participant list and select "Create group rooms". Here you can specify the number of rooms and the assignment. The time you set here is a hard limit. After the time has elapsed, the rooms are closed and everyone ends up back in the main room.
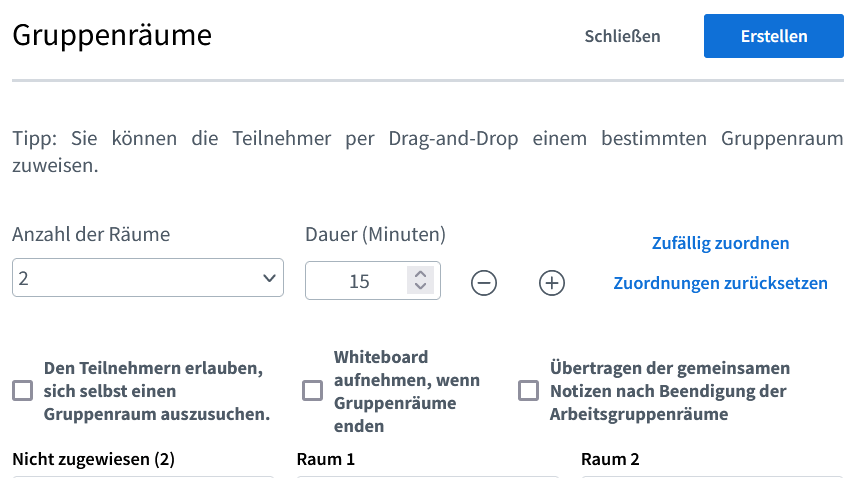
In the public chat, you will always see a message like the following at the top: "To join this meeting by phone, dial: +4930 123 456 789 and enter the following PIN: 12341234123#. Use the 0-key on your phone to toggle mute on/off". You need the phone number and the PIN. If you can't get into the meeting and chat yourself, have someone in the meeting send it to you. Once you're in, you can mute or unmute yourself using the 0 key.
If you have the role of moderator in a meeting, you will see a message at the top of the public chat like: “To invite external guests, share this link: https://wechange.de/bbb/abc-def-hij/". Copy this link and send it to a person you want to invite to the meeting. The other person does not have to be registered on wechange.de. If they are not registered, they only need to enter a name and agree to the terms of use after clicking on the link.
The invited person now has the role of "guest". This means that they cannot be promoted to the role of "moderator". However, they can be promoted to presenter (by a moderator).
As a presenter (see below for roles and permissions), you can click on the blue button with the plus symbol at the bottom left. Select "Upload/manage presentations".
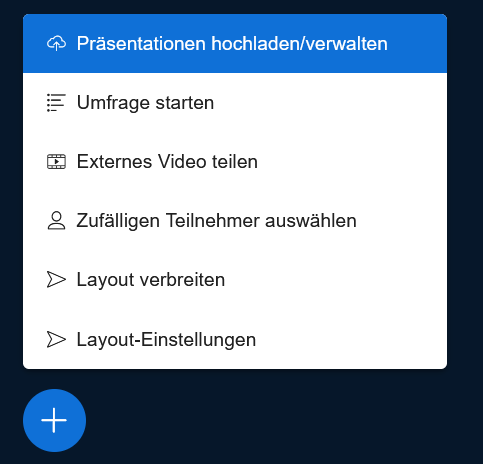
Now you can upload a file and confirm. The file will now be converted to a PDF and displayed to everyone. As a presenter, you can use the arrow icons below to move through the slides. If someone else becomes a presenter, they can continue where you left off or upload another PDF file and display it.
We recommend converting files to PDF before uploading to ensure everything looks the way it should.
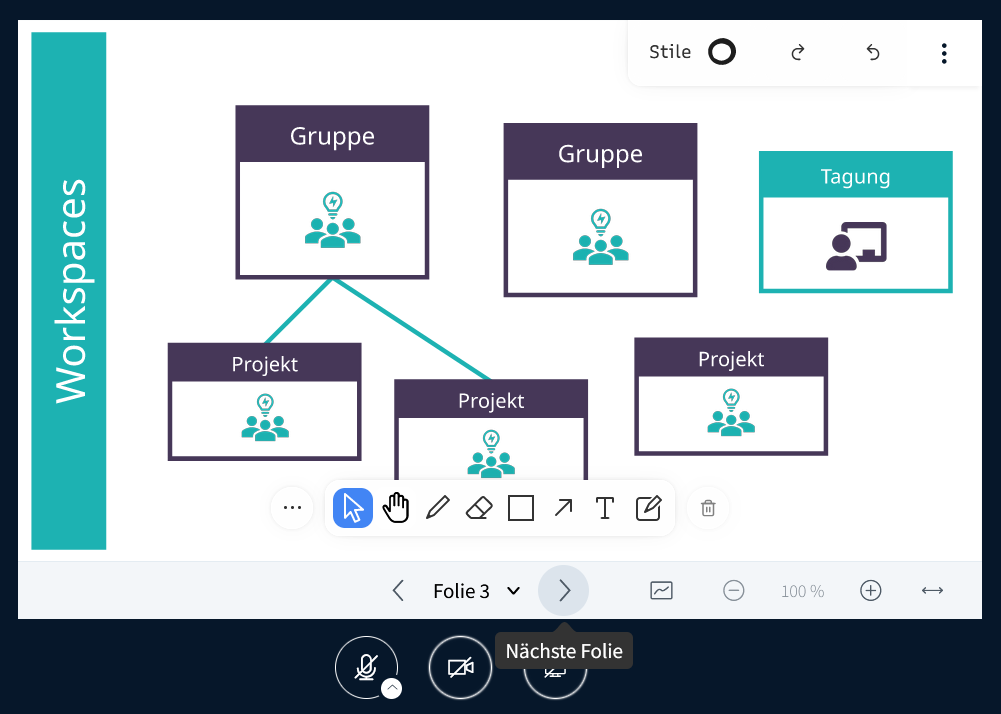
As a presenter (see below for roles and permissions), when you share an uploaded presentation (see above), you can add annotations (lines, geometric shapes, arrows, text, notes) to it. You will see an annotation bar at the bottom for this. At the top under "Styles" you can select the color, thickness, line type, size and font of the annotations. If you click on the cursor ("Select") in the annotation bar, you can move existing annotations or otherwise change them.
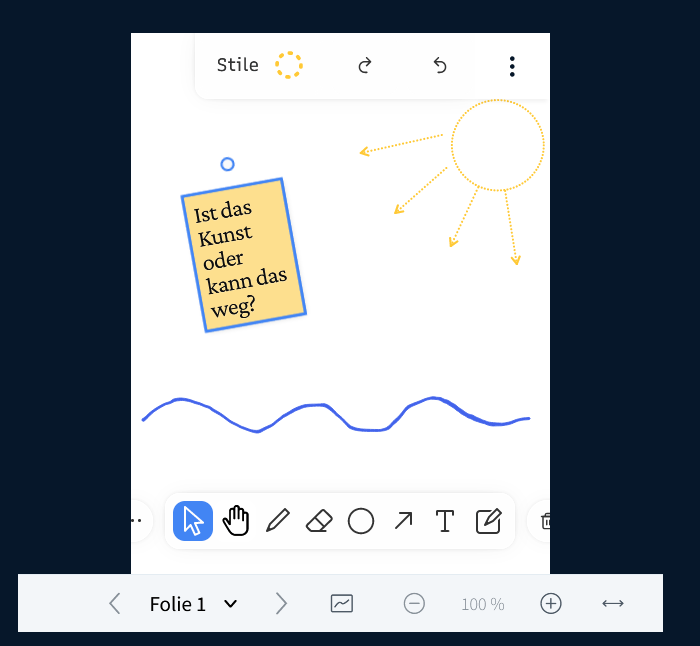
By default, only the person with the "Presenter" role can make annotations. However, the presenter can activate multi-user mode using a button in the row below the annotation bar.
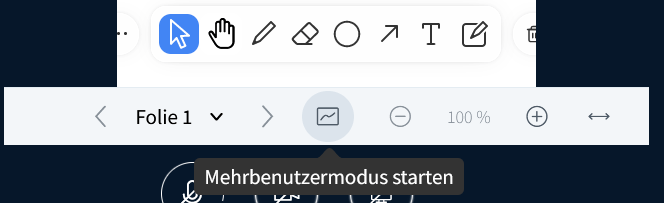
Now everyone can use the whiteboard tools - until the presenter deactivates the multi-user mode again. As a presenter, you can also give individual participants access to the whiteboard by selecting them in the participant list and choosing the corresponding option. Individual participants can also be denied access to the whiteboard.
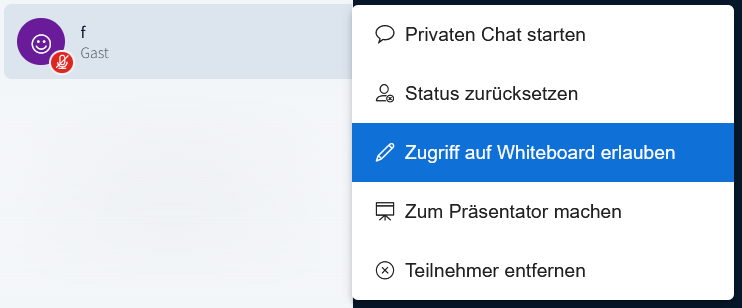
By the way, the annotations stay on the slide. When you move to the next slide, they are gone. When you move back, they are there again.
Once you've enhanced a slide using the whiteboard tools, you may want to download it. To do so, anyone can click on the three dots in the top right of the presentation and select "Download current slide." The slide will be saved as a PNG.
In BBB meetings, there are two "classic" roles, namely participants and moderators, as well as the additional role of "presenter". Participants have limited rights, for example, they cannot create breakout rooms or end the meeting for everyone.
However, moderators can do all of these things - similar to how admins in WECHANGE groups and projects have more rights than regular members. For example, they can also mute participants (but not unmute them). Moderators also see a gear icon above the list of participants. Using this additional moderator menu, they can, among other things, restrict participant rights.
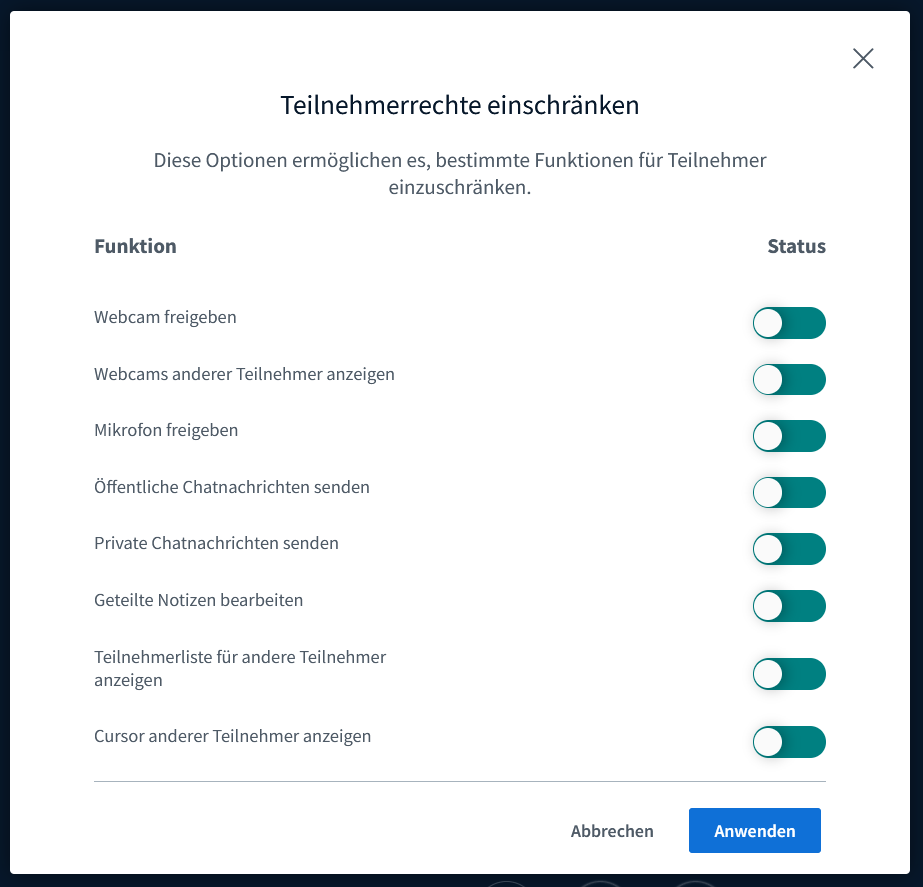
In addition, moderators can appoint themselves and others as presenters by clicking on the desired person in the participant list and clicking "Make presenter". Only as a presenter can you share your screen or show an uploaded presentation (see above). In addition, as a presenter you can use the whiteboard tools yourself and also allow others to access the whiteboard in multi-user mode (see above).
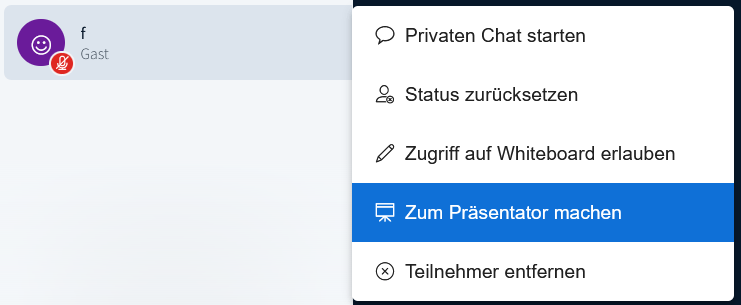
We have set it up so that group/project admins are automatically moderators in the BBB meetings within the group/project. All normal members of the group/project are participants in the meeting. In BBB meetings within events, the person who created the event is also the moderator.
Moderators can also promote regular participants to moderators. The exception is “guests”: Participants who joined the meeting via the external invitation link (and therefore have the designation “guest” in the participant list) can not be promoted to moderators.
Watch out: If no admin is participating in your meeting, no one is a moderator. This means that no one can become a presenter to share the screen. Functions such as breakout rooms or recordings cannot be used without a moderator.
As a presenter (see above for roles and permissions), you can click on the plus button at the bottom left and click "Start poll". The prerequisite for this, however, is that a presentation has been uploaded and selected. This can also be the standard slide that is uploaded and preselected at the start of each meeting.
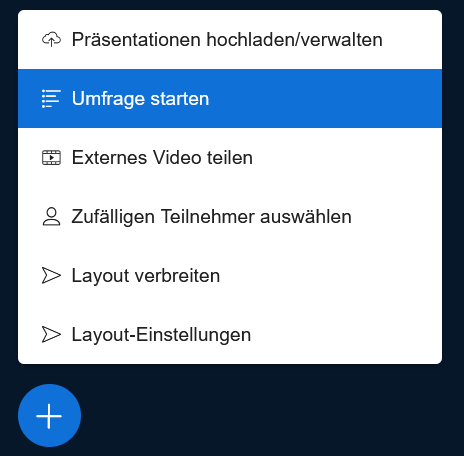
The rest is self-explanatory and is best discovered by trying it out for yourself.
If your webcam is shared, you will see an arrow next to the camera icon at the bottom. Click on this and select "Open advanced settings". You can now select a virtual background.
In order to record meetings, this must be allowed in the group/project settings. As a group/project admin, you can select and save the option “Yes” in the settings below under “Embed video conference” -> “Allow recording”.
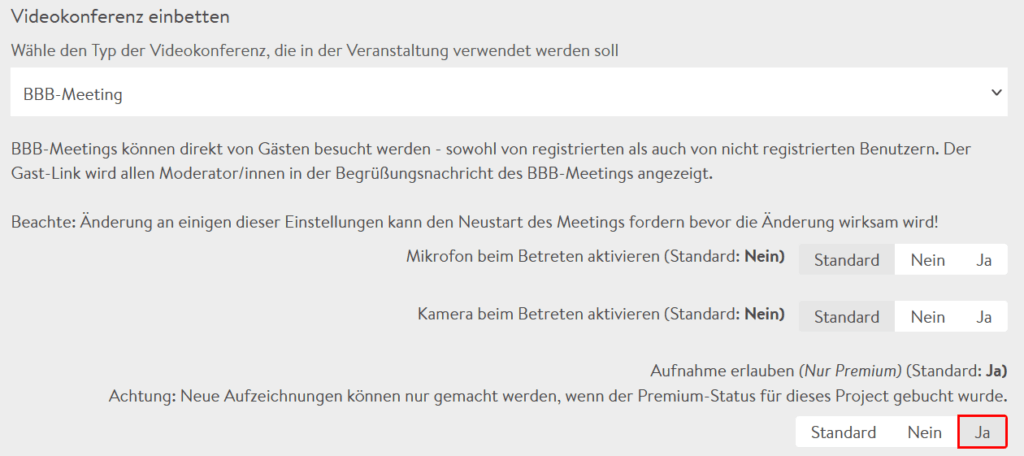
Now, when entering a BBB meeting, everyone is asked whether they agree to be recorded. As a moderator (see roles and permissions above), you can click on "Start recording" at the top.
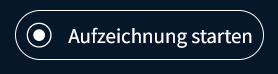
If you click on it again, the recording will be paused, but can be continued later. The recording is only finished when everyone has left the meeting or a moderator ends the conference for everyone. It will appear a little later under "Recorded Meetings", which you can navigate to via the group/project menu. The longer the meeting, the longer it can take for the recording to appear there.
You can use the group/project dropdown menu to switch to Recorded Meetings, where they will appear after a short time. The longer the meeting, the longer it may take for the recording to appear there.
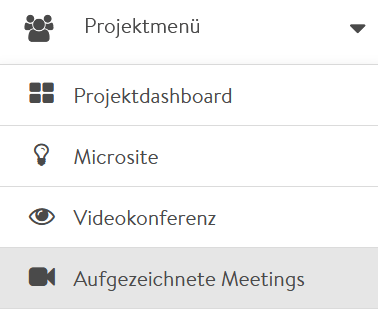
14. Data Protection
1. How often have you been DDOS attacked?
We have not yet been the victim of DDOS attacks and have never been blackmailed. Regardless, there is not much money to be made from us 😉
2. How do you protect yourself from other attacks?
The firewalls are configured so that, in addition to https, only the ssh protocol is permitted, for which a particularly secure cryptographic key is required for authentication (ED25519). If an attacker makes multiple failed attempts to access the network, he will be blocked.
3. What data can attackers steal if they hack you?
If our backup server were to be hacked, only encrypted data would be stolen. WordPress installations and WECHANGE portals run in individual, separate environments. If an attacker gains access to a WordPress installation, he or she will not have access to other WordPress sites or WECHANGE portals, and vice versa.
We do not collect any personalized metadata about users because advertising is not part of our concept. Accordingly, potential hackers cannot find out anything about users' usage behavior and cannot read anything in our internal analysis tool or carry out meta-analyses.
4. Do you always have the latest security updates?
All services that we do not develop ourselves are updated by our service partner as soon as security updates are available. WECHANGE is programmed in Django / Python. We implement Django security updates within a maximum of 10 days.
6. How do you protect yourself against cross-site scripting and similar?
All requests from the browser contain a CSRF (cross-site-request-forgery) token, which prevents other websites from forging requests to WECHANGE.
We take data protection very seriously and comply with the strict German data protection requirements. The data you enter on wechange.de will not be used for advertising purposes and will not be passed on to third parties.
Data security is a top priority at wechange.de. Data security was confirmed by TÜV Süd in November 2015.
On wechange.de you can set up in great detail and change at any time which data you want to make visible for which user(s)/groups. You can set the visibility globally, per group/project, but you can also choose to deviate from this for each newly created element (event, news, document, task, etc.).
If you delete your address in your personal profile, it will not be automatically deleted from the map. Instead, you will have to click the grey "Delete" button again. Then just click "Save" in the bottom right. And you're done!
According to the European Data Protection Regulation, this requires a special agreement - the data processing agreement. Since more and more initiatives, organizations and projects are working with personal data within WECHANGE, it is important to sign a data processing agreement with us.
If you as an initiative work with sensitive, i.e. personal data and want to store it on our server, i.e. in the Nextcloud or in a pad, then you need the agreement mentioned above.
We would like to offer you a simple and quick solution for this. We have prepared a data processing agreement (AVV) for you, which is already pre-signed by us - the wechange cooperative - as a blank document to fill out as a PDF document. You can do this find here.
15. Miscellaneous
If you click on the magnifying glass symbol in the top menu bar, a search bar will appear. Simply enter your search term here. You can also filter your search to search specifically within projects, groups or users.
We welcome constructive feedback so that we can continually improve wechange.de. Feel free to write to us at support@wechange.de and we will try to respond as quickly as possible. Thank you for your help!
There is already an app for Android that free in the Playstore is available. It simulates the mobile browser view of WECHANGE and also allows you to receive push notifications. An app for iOS will follow shortly.
In addition, WECHANGE is optimized for mobile use and can be used via various browsers on a smartphone or tablet without an app.